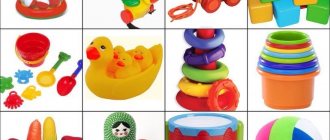
What is a busy board
This is an educational toy, which is a small wooden, plywood or cardboard base with many small objects. For the game, locks, doors, latches, lacing, various buttons, sockets, small puzzles, abacus, switches, buttons with fabric loops, etc. are used. The more objects that are varied in color and purpose, the more fun it is for the child to study them. Fiddling with small parts is not only a fascinating process for children, active work with fingers develops fine motor skills of the hands, in addition, such entertainment is useful for general development.
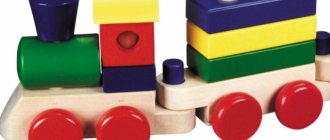
Children's educational board with various objects
A development board, purchased in a store or made independently, may differ in material, size, number of parts and color design. To make this educational item, it is recommended to use materials of different textures. Each of the elements presented on the board will give the child new ideas about the world around him.
Children's educational board with drawing board
Busy board ideas for girls
When creating a busy board for a girl, it is better to use light shades of wood. You can decorate the board with hearts, butterflies, fairies, princesses, and fairytale castles. Popular items for a girl’s educational board:
- buttons, zippers, lacing;
- plastic mirror;
- push-button telephone;
- tablet for drawing;
- bell.
You can also take a square or rectangle as a basis, or you can create a base in the form of a shoe, crown, or heart.
At what age can you play with a touch board?
The developmental board begins to interest the baby from about 8 months. By this time, the child already knows how to sit and focus on the process. However, until the age of one year, it is not recommended to use hard boards; at first it is worth playing with soft parts made of fabric and thick felt (when buying felt sheets, you should pay attention to their thickness, it is better to take at least 1.5 or 2 mm). All items are attached to the base using a system of Velcro and buttons.
Children's educational board with switches and light bulbs
The types of parts differ depending on the age of the child. So, a one-year-old baby is more interested in pulling handles, opening windows and doors with locks with pictures of animals behind them, pressing buttons, etc. But older children (3-4 years old) will be more interested in looking for numbers and letters, opening locks and solving simple puzzles .
Children's educational board with phones
At what age is a busy board suitable for children?
DIY children's busy board for children
If you decide to give a busy board to a 2-3 year old child, you will make the right choice!
And, having decided to please a toy with a bunch of “forbidden” things for a very little one who has just learned to crawl, but is already actively interested in the operation of sockets and switches, you will do even better.
But still, for babies under one year old, we recommend using “soft” filling of the board: rag windows, lacing, Velcro, ribbons.
The younger the age of the child who is allowed to play with everything that is “not allowed”, the sooner the child understands the principle of operation of these things, and the less the risk that he will decide to play with real objects.
What a development board will teach a child
Today, great attention is paid to the early development of children. Parents try to teach the baby various wisdom early. A busy board is necessary to keep your child busy with an interesting educational game. He will explore the world on his own, even without the help of his elders.
During such exciting activities, the baby develops the following skills:
- logic - the child builds a chain of conclusions: to ring the bell, you need to press a button; to open the door, you need to pull the latch up;
- fine motor skills of the hands - the baby learns to work with small objects, receives new tactile sensations;
- perseverance - a daughter or son will finish the job they start in order to achieve a positive result - tie a bow, open a lock;
- attention and memory - children remember their actions with small details and objects, and later they will perform them automatically.
According to the Montessori method, parents should not interfere with the process of their child playing with a busy board. Let your child find solutions and draw conclusions on his own.
Benefits of classes
Most psychologists argue that the development of a young child should take place in the form of play. A board for developing fine motor skills is perfect for this. They make simpler bodyboards for kids with their own hands, but for older children they add various elements, complicating the tasks. By playing with them, children develop:
- Fine motor skills. Tactile contact occurs with objects of various shapes and textures, thanks to which children receive new sensations.
- Patience. Kids are not always able to immediately cope with the lacing or open the latch, so they have to be patient and persistent. At the same time, no one should help the child solve the problem.
- Logics. Exercises with a busy board help the child draw conclusions and build logical chains. The kid will understand: to turn on the light bulb, you need to flip the switch, and to open the valve, you need to pull the latch.
- Get more information. For a 2-3 year old child, you can place letters, numbers, objects of various shades and shapes on the board. This way he will gain new knowledge and learn to distinguish colors.
Types of busy boards: choose a board according to the age and gender of the child
You can make a busy board with your own hands by the 1st year of a child’s life. He can play with it from as early as 8 months of age, when he can sit up confidently. As the baby grows, the product should be upgraded.
When creating a development board, parents should take into account the age of the children, their gender, their own interests and hobbies.
Let's look at the features of designing a busy board according to the age of the children:
- For children 8-12 months old, soft models of development boards are suitable. It can be made in the form of a rug or a book. Felt or textiles are used to create the product, all parts are firmly sewn, making them safe for the baby. You can design a colorful pillow with beautiful pictures and details.
- Children 1-2 years old can already be offered a hard bodyboard for playing without sharp parts or corners on its surface, so that the child does not get hurt. The child becomes familiar with fastening large buttons and lacing ropes. The themes of the pictures are animals, nature, clothes.
- Children aged 2 to 3 years will be interested in learning numbers, shades and colors. Set up a busy board with many windows and doors. To open them, the child must master the lock or latch. At this age, you can offer a development board in the form of a house, car, castle or cube.
- Preschoolers aged 3 years and older should be given more difficult tasks. You can make a large business board for the entire wall of the room, where there will be many elements and details - small and large. Add numbers, letters and syllables to various pictures and drawings on the business board.
We recommend reading: Plasticine dog: simple instructions and step-by-step plasticine modeling schemes + photo reviews for children with the best product options
Such products not only develop fine motor skills and other skills. They give an idea of the objects of the surrounding world and natural phenomena.
An example of creating an educational toy with your own hands
First, you should prepare a sheet of plywood or chipboard of the desired size. If necessary, sand it and cover it with odorless varnish so that the baby does not get hurt or get a splinter in his fingers. Prepare the parts that will be placed on the board. On a wooden sheet, mark places for attaching objects.
If you wish, you can paint the board, glue decorative drawings on it, and then carefully attach all the details. Make all fastenings using a screwdriver and self-tapping screws so that the parts are firmly fixed. Secure the finished developing board and you can call the child so that he can appreciate it!
On the Internet you can find step-by-step instructions with photos of various business boards for making yourself. These educational boards in the form of a house, cube, airplane, car, and various animals look very interesting and original.
What subjects to choose
A number of companies involved in the production of educational boards accept orders for the production of such toys according to individual standards. However, the development board is simple enough that you can make it yourself.
Children's educational board with the child's name
Children's educational board with numbers and drawing board
Children's educational board with houses
The main thing is to decide in advance what needs to be placed on it:
- buttons with loops;
- hooks for clothes;
- doors with locks;
- small light bulbs;
- switches;
- sockets;
- abacus;
- toggle switches;
- buttons or telephone dial;
- remote controller;
- eyelets with laces to help you learn to tie shoes;
- coils, etc.
The choice and quantity depends on the age of the child. The older it is, the more complex in design the parts may be present on the gaming panel.
Children's educational board with telephone
Children's educational board with telephone
Children's educational board with various interesting objects
How to make a busy board safe
Even if you keep an eye on your child during games, the development board itself (its elements and materials) must be safe.
- The finished board must be well secured so that it does not accidentally fall on the baby’s head during particularly intense play.
- When choosing a base for the game panel, make sure that it is smooth and free of nicks. Corners and sharp protrusions must be rounded yourself or covered with special plugs or soft material.
- Each removable part must be tied to the panel with a strong cord so that the baby does not accidentally drag it into his mouth and swallow it.
- Once you attach all the components to the board, be sure to check that they are securely fixed. A small child should not tear them off, even if he makes every effort.
- If the toy has luminous parts, they must be powered only by batteries.
- A development board, purchased or home-made, can be safe. But the number of elements depends only on the age of the children playing and their personal inclinations.
Children's educational board with compass
How to make a DIY board for a boy and a girl
Educational boards are sold in almost any children's toy store. But you can make such a device yourself. In this case, the size and shape can be any.
For manufacturing, you should choose materials of different texture and color.
How to make it safe?
It is very important that the toy does not harm the child. Even if the mother is constantly present near the baby during the game, the bodyboard should be safe. You should take care of safety in advance by following these rules:
- Reliable fastening. While playing, kids often tug at the elements on the board, trying to tear them off. To prevent the toy from falling on the baby, it must be securely fastened.
- Smoothness of the base surface. Often the base of the toy is made of wood, plasterboard or plastic.
Remember!It is very important that there are no jagged edges, sharp protrusions or corners on the surface.
- If the board has removable parts, they must be attached to it with rope. The baby may pull the small part into his mouth and accidentally swallow it.
- Reliable fixation of all elements. This is an important point, since a poorly sewn button can end up in the baby’s hands, and then in his mouth, nose or ear.
- Do not connect luminous or musical elements to electricity.
You can use batteries to power them.
What will you need?
An educational business board is easy to make with your own hands. At the same time, on the board you can place those household items, interior details and other elements that are of interest to a particular child. Personalized bodyboards are especially popular.
Before you start working, you should decide in what style to make the board. Then specific objects are placed on it. Most often, the following elements, objects and devices are used as materials:
- zippers, hooks;
- locks with keys;
- wooden or plastic abacus;
- buttons and beads;
- switches, sockets and plugs for them;
- clothespins;
- ropes and laces;
- buttons from the remote control or telephone;
- doors and latches or locks;
- scraps of fabric of different textures and colors;
- taps and mixers;
- eyelets with laces (so that the baby learns to lace shoes).
You need to choose materials taking into account the age of the child.
A baby under one year old will not master the locks, but he will definitely like the rustling and glowing details.
Stages of creation
It can take a lot of time to make a busy board. It all depends on the complexity of the structure and the number of elements on it. As a rule, creating a board takes several stages:
- Preparing the base. It can be wooden, fabric or made of plasterboard. First, cut out the base of the desired shape and size. Afterwards it is processed (sanded, rubbed, painted).
- Marking and designation of the location of elements for the game. To do this, special marks are applied to a piece of plywood or fabric with a simple pencil.
- Creating holes for hinges. Small holes should be drilled along the edges of the board. You also need to take care of the fasteners.
- Creating a background. It is better to choose calm tones.
- Drawing. You can draw a house and make the doors so that they open. Or depict a car, a tree, the sun.
- Placement of parts. It is better to place large elements in the center and small ones at the edges. To secure them you will need screws, self-tapping screws or glue.
- Before giving a toy to a child, you should check it and make sure that there are no loose parts on the board.
Ideas for boys and girls (with lighting)
Boys and girls from the age of 2 begin to like different toys. Therefore, when making a bodyboard, it is important to take into account the gender of the baby. Boys love cars, spaceships, tools. Therefore, the following stylized toys are suitable for them:
- Bizimobiles. They can be made with glowing headlights.
- Instrument panel of a spaceship.
- Country of boys. This is a prefabricated board with items for boys to play with.
Girls prefer dolls, cosmetics, and beautiful clothes. You can also make busy boards in a girly style and please your daughter:
- Toy kitchen.
- Beauty saloon.
- A castle for a princess.
See also:
How to make a ninja weapon out of paper - step-by-step instructions and tips ⚔
What are the features of development boards
It is precisely in order to “legitimize” that development boards, busy boards, are created. They help develop fine motor skills, logic, and will stimulate the development of new tactile sensations and the thought process.
Author of educational boards - Maria Montessori
Interesting. The educational board with locks was first proposed by Maria Montessori - not only as a way to keep the baby busy, but also as a tool for developing important everyday skills, imagination and intelligence. The Montessori method, which states that a child develops best during play, is still popular today.
Store-bought educational board for children. At the end of the article, see where you can order similar toys
You can add latches and keys, locks and latches, pictures and fabric to the board, decorate it with photographs and inscriptions, create “replacement sets” on one base so that your baby doesn’t get tired of the toy for a long time.
Photo: busy board
It is believed that a development board is optimal for activities with a child aged 10 months to two years, and the most complex designs can be used up to 5 years - it all depends on what will be on them.
The base is ordinary plywood
By the way, exercises with a development board are both finger exercises and the mental development of the baby. It usually includes:
- switches;
- locks with keys;
- latches and bolts;
- flashlights and handsets, disks;
- hooks;
- abacus;
- door chains;
- beads;
- fabric scraps;
- pictures with numbers or animals.
Advice. To create a development board, you can use anything that will spin, click, move and light up. You will bring everything that is of interest in the apartment onto one compact surface, and this will both interest you and protect your baby from the unpleasant consequences of “free exploration.”
DIY educational board
The easiest way is to create a classic busy board. Figured and double-sided bodyboard are more complex options that require certain skills and tools. But bizidom, bizicube or other three-dimensional types of development boards are suitable only for those who are willing to spend more than one day, or even a week, on their creation.
You can make a busy board yourself, with an older child for a younger one
You can find calculations, dimensions and drawings for small cubes or houses on the Internet. But if you want to create something more unusual, for example, a pyramid or a real bisimachine, then you will need to think through fasteners, joints, as well as where and what elements to attach, you will need to do it yourself. It will also take time to connect the electrics and various beeper buttons. Therefore, if you are limited in time or are not sure that you can do all this, then it is better not to create a problem for yourself, but to make the simplest development board.
At least the child will be able to use the simplest busy board while you are making something more complex. After all, practice shows that many adults themselves are carried away by the process of creating such an educational toy, as a result of which it can fall into the hands of a child only after a few months.
List of the most necessary tools
To create a busy board, first of all you need material for the base. Most often, furniture board 18 mm thick or plywood (12 mm) is used for this. If you choose plywood, then do not forget to pay attention to its grade. It should be no lower than 2/4, but it is advisable to use higher quality material. In addition, shelves from old cabinets (they are thicker), metal sides from a computer system unit, or even an old suitcase are suitable as a base.
busyboard how busyboards are made
The following tools will be required:
- Screwdriver;
- Screwdriver;
- Jigsaw;
- Roulette;
- Wire cutters;
- Scissors;
- Pliers;
- Sanding machine or other abrasive materials.
In addition, you will need a set of fasteners:
- Self-tapping screws. It is desirable that their length be no more than the thickness of the base;
- Bolts;
- Washers;
- Corners;
- Nails;
- Super glue;
- Other.
Here it all depends on which version of the bodyboard you choose, as well as on which elements you will attach.
DIY elements for a busy board
By the way, don’t forget to assemble it at home and also buy all the necessary parts. In addition, if you decide to paint the base of the bodyboard or varnish it, be sure to prepare these materials as well. Also don't forget to buy brushes and sponges for painting.
Stages of work
Once you have acquired all the necessary elements, fasteners and tools, you can begin to create a business board. This process consists of several stages:
- Trying on and laying out all elements. This is necessary in order to make sure that you have thought through everything and calculated correctly. It’s better to do this in advance than to try to correct your own mistakes later.
- Cutting the material. Now it’s worth cutting out one or more planes that will serve as the base of the bodyboard, doors, strips and other elements necessary to realize your idea.
- Sanding the base and other parts. To start, use a coarse sandpaper. With its help, you can get rid of the sharp corners of the future bodyboard. After this, you can move on to sandpaper with a finer grain in order to sand the entire working surface of the development board.
- Painting. All elements should be painted in 2 layers. After you apply paint or varnish to the bodyboard parts for the first time, notice that their surface has become rough again. To get rid of this, you should sand the already dried parts again, using sandpaper with the finest grain. After this, apply the varnish or paint a second time and wait until it dries completely. If you decide to leave the base of the bodyboard unpainted, then you can simply skip this point.
- Assembly. Now all that remains is to carefully assemble everything and securely fasten it. Also here you should make sure that the elements you screwed on do not have sharp corners, there are no small removable parts that a child could swallow, and the screws have not gone through anywhere and do not stick out with sharp ends.
- Refinement and decoration of the development board. This can be done before assembling the bodyboard. It all depends on your idea and how it will be more convenient for you. With the help of drawings you can make the board unique and inimitable. Drawings can be applied either by hand or using stencils. In addition, you can resort to the decoupage technique, or simply place beautiful pictures, family photos on the development board, or cover it with various stickers.
How to make a traditional rigid structure
For a development board you will need a piece of plywood or wood, but plastic, hardboard, or cardboard will also work. As for the dimensions, they are chosen depending on the availability of free space.
We recommend reading: How to weave a bracelet from rubber bands with dragon scales: on a loom and forks
You can make a busy board yourself
Information. The most compact development boards are small modules of 50x50 cm format, and for grandiose plans you can use a base up to 1.7 meters wide.
You can involve the whole family in creating a development board for your baby - dad will think of safe and practical fastenings, mom will do the design, older children can offer “filling”. By the way, to create a development board you don’t even have to go to the store - you’ll probably find all the necessary elements in closets and mezzanines.
If you don’t have suitable “treasures” at home, then you can turn to your grandparents, because they usually save old things that can be put to good use.
Attached to a homemade development board:
- bolts, latches, latches, latches, hooks and padlocks (by the way, mailbox locks are the easiest to open with children's fingers);
- switches and buttons - they can just click, or they can turn on something - for example, small bulbs from an old flashlight;
- door chains, loops, hooks;
- all kinds of toggle switches;
- socket and plug (not connected to electricity, of course);
- a battery-powered doorbell (choose a signal that suits you, because you will have to listen to it very often);
- panels with buttons - for example, from an old remote control;
- reels and laces - with their help you can create interesting lacing;
- zippers and buttons;
- watch dials;
- rotary toggle switches.
Before you make a development board, you need to find a suitable base - the more different elements there are on the board, the more interesting the toy will be for the baby.
However, do not forget to take into account the availability of free space, because the toy will need to be attached somewhere, and doing this with a bulky structure may be inconvenient.
Think about the arrangement of the elements, make pockets and doors, and then move on to the design stage. To decorate the development board, multi-colored fabrics that feel different to the touch, as well as colored cardboard, are suitable. You can use pictures with animals, numbers and letters.
You can hide cute pictures with cute animals, flowers, numbers behind the Velcro windows - and not only open/close, search and twist, but also learn the counting, names of animals, their habitats, primary colors and so on along the way.
It is important that the child will not lose interest in a well-thought-out development board for a very long time, and even if this happens, you can always come up with a different design.
Using a development board will help you keep your baby occupied for a long time - he will play with pleasure, each time doing the necessary exercises for his fingers, and explore the objective world.
And parents will be able to take part in the game or leave the baby alone with their new “field of activity.”
Do-it-yourself busy board. Master Class.
DIY children's busy board for children
You can save several thousand rubles and clear out unnecessary things from your closet by making a busy board yourself.
This will only take a couple of hours, but how much joy a new toy will bring to your baby!
How to make a business board on your own?
In stores you can find factory copies of development boards. Taking them as an example, it is quite possible to create a business board with your own hands.
A child will appreciate a craft that comes out of the hands of parents more than a faceless stamp.
So, you decided to create a development board yourself and are now wondering how best to do it.
Stages of creating a business board. Step-by-step instruction:
- Choose a board and decide what you want to post.
- Treat the board carefully, you don’t want your child to get a splinter on his finger.
- Mark on the board where the parts will be attached.
- Decorate the board or glue pictures (if you want to make it more attractive).
- Attach all elements.
- Carefully check the reliability of the fastening yourself.
- Secure the board itself.
- Show the surprise to your child!
Dimensions, materials
First you need to choose a base. As a rule, for this they take a small piece of plywood, plastic or laminated chipboard. A regular board will be too heavy, and a non-laminated board may bring a bunch of splinters to your son or daughter instead of being useful.
Small planks, the same plywood or pieces of laminate are used as additional inserts. Sometimes, for a busy board, thick corrugated cardboard is used as a basis. It will be convenient if you decide to introduce your child to the world of fabrics and sewing accessories.
You need to decide on the size based on how much free space there is in the room where you plan to place the busy board. It is also worth considering the age of the baby: for a baby who is just crawling, a small board with a couple of objects is enough (babies cannot play with more than 2-3 toys at once). An older child can build a real stand, which can be mounted on the wall or left mobile.
On average, the size of a busy board, convenient for children from 6 months to a year to play with, is 300x300 mm - 500x700 mm. For children over one year old, you can offer a larger toy, but of such a size that the child can easily reach the desired object without leaving his seat (on average, up to 1 m²).
It is better to make a busy board from a natural board or a piece of thick plywood. It is not necessary to paint the future stand; it is better to leave it without paint at all and sand it down so that the child does not get a splinter.
For fastening you can use glue and screws.
DIY children's busy board for children
To work, you need to prepare a smooth, sanded board of the required size.
You can make a small portable board, which the child himself will carry to the right place (30*30 cm) or a full-fledged busy board, which is installed against an empty wall; it can reach sizes of 100*80 cm or more.
By the way, the following sizes are often found on sale: 40*40cm, 70*50cm, 100*80cm, and their prices range from 2500 rubles. up to 6000 rub.
Well, if your house has a suitable board (maybe a door from old furniture) and many elements from the list presented above, then you can save a serious amount of money and arrange all the items the way you want.
If you don’t have suitable items in your home, we recommend asking around from relatives, friends, or simply buying everything you need in stores. So, the board has been selected, the elements have been purchased, lay out all the objects on the board as you see fit, then glue some of the objects (light in weight) using Moment glue, screw the others with a screwdriver. The finished board can simply be placed against the wall or hung on pre-driven nails.
As you can see, there is nothing difficult in making such a board yourself, even if you have never held a screwdriver in your hands before, you will instantly understand what’s what and quickly deal with the task.
Filling
DIY children's busy board for children
The next step will be to sort out your mezzanines and old drawers for spare parts for furniture and other small things that you once felt a pity to throw away. If you are a stickler for cleanliness and you can’t find such parts in your home, you can always buy them at a hardware or hardware store. Moreover, you still have to go there to get screws for fastening.
After you have brought to light all the future fragments of the development board, try to arrange them and decorate the board. Often, to emulate entrance doors, small plates on small hinges are placed on the board, which the child can lock himself with various types of latches and locks. Behind such a unique door you can place a niche. Then the child will be able to arrange hiding places there, hiding his favorite baby doll or donated candy.
It doesn’t matter if something doesn’t fit on the first version of your business board - in the future you can always supplement the board with these copies if something goes wrong there.
And finally, the last stage is to securely fasten all the fragments with self-tapping screws or nails.
Carefully inspect the opposite side of the board. The protruding sharp ends of the screws can injure the child, so they will need to be treated with sandpaper or a file.
Parental imagination will tell you what to fill the board with. First of all, you can start from the person for whom the bodyboard is being prepared - for a boy or a girl.
Anything that is interesting to the child and safe can be used (no sharp or cutting objects, toxic materials, small, poorly secured objects).
Material to use
It is best if elements from various materials are attached to the board:
- fabrics,
- metal,
- plastic,
- rubber.
This will diversify the range of sensations and the baby will not have time to get bored.
The most used parts for a bodyboard are:
- Inoperative socket with plug;
- Cabinet door handles or door hook;
- Door handles;
- Lacing;
- Door knocker;
- Small computer keyboard;
- Light switch;
- Battery operated doorbell;
- Door chain;
- Working calculator;
- Plastic mirror;
- Yardstick;
- Compass;
- Clock with hands;
- Door numbers;
- Keyhole with key;
- Bicycle horn;
- Reflectors (reflectors);
- Small lock with or without key;
- Faucet with valve;
- Furniture wheel;
- Abacus;
- Homemade doors on awnings
- Chains with large rings;
- Springy cord from a wired telephone;
- Bubble film;
- Unnecessary children's shoes with laces;
- Bell;
- Magnifying glass on a string;
- Large suckers
- Door chains, hooks, loops;
- Bolts, latches, latches, latches, hooks and padlocks (for example, small letterbox locks), bicycle locks;
- Flashlights, small lamps powered by batteries;
- Switches and buttons, it is not at all necessary that they turn on something;
- All kinds of toggle switches;
- Old rotary telephone; old remote control or push-button telephone;
- Reels and laces - you can use them to create interesting lacing;
- Zippers and buttons;
- Various wheels;
- Rotary toggle switches
- Door latches, locks, latches, latches, hinges, handles, borders and everything that is called door hardware. Something can simply serve as a frame for a busy board
- Construction and massage rollers. Even a thick toilet paper roll will do
- Lacing. An image of shoes is usually drawn on the base, rivets are attached to it and the laces are tucked in according to all the rules. It is better if you choose bright colors for this element
- Fasteners, zippers, Velcro, buttons, hooks and loops. All this can be found in a sewing store and sewn onto durable scraps of fabric, which are then secured to the base.
- Bells or similar parts that produce sound. An old doorbell or xylophone parts will do.
- Abacus, large rings on a piece of old cornice, or just beads strung on a thread. By moving them in different directions, the baby will be able to learn counting.
- An old telephone dial or keypad from a mobile device
- Lightning. For simplicity, they usually use “tractor” type zippers; they can be attached using good glue or a stapler, and decorated again using a design: for example, it could be a jacket or a crocodile that has a zipper instead of teeth!
- Pieces of various fabrics
- Flashlights and lighting. Naturally, the simplest and most understandable to a child
- Postal locks with keys
- Buttons, animal eyes and other sewing accessories
- Panel with buttons from an unnecessary electrical appliance
- Those. it can be anything that can be touched, moved, studied without any threat to life.
DIY children's busy board for children
This list is just a rough guide of what you can use. If you find something else in your home that will be useful for the development of your child, add this element to your development board. The main thing is that the new fragment is safe and cannot injure the child in your absence.
Educational bodyboards will be most interesting for kids if there are as many fixed objects as possible, and each of them can perform some kind of action. So, let’s say that when you press the bell button, the child will hear a melodic sound, when you pull the door chain, you will feel it sliding, etc.
Soft fabric options
If you are creating a gaming panel for a very small child, then it is better to make it soft. It will be similar to a developmental mat, only in a slightly different format.
Use an old pillow or thick fabric stretched over a frame as a base.
In this case, the game elements include: ribbons, buttons - a variety of shapes, colors and methods of fixation, loops and hooks, Velcro, pockets, appliqués and patterns, curtain rings and laces, small toys, rattles.
Everything you consider necessary should be securely sewn to the base. The brightest elements can be hidden behind fabric doors, and toys tied with braid can be placed in pockets. You can make lacing, abacus from rings - everything is limited solely by your imagination.
Business board - what is it?
Busy board - busy board
from the English
busy
- busy and
board
- board.
All small children love to open cabinets, pots, and refrigerators; press buttons from remote control panels; turn lights on and off in all rooms and much more. Why not allow them such entertainment without fear for their safety? To do this, you can create a development board or busy board for children with your own hands or buy it in a store.
A busy board is an educational board (stand, module) on which many objects are placed (locks, doors, buttons, latches, latches, clothespins and other small “dangers”) that a child is usually not allowed to touch.
In addition, a busy board can be filled with toys or objects of different shapes, colors and textures: things that can be touched, stroked, moved, pressed, switched.
All this must be securely fastened to the bodyboard so that the game is safe for children.
These boards can be purchased at toy stores, purchased to order online, or made yourself. You can make such a toy yourself in a day or two, and the child will play with it for quite a long time.
The essence of a busy board is that the child learns to develop finger motor skills, thinking and logic, and the more different elements are attached to the busy board, the more interesting it will be for the baby. In addition, such a board is an excellent way to distract a child for a while, thereby giving yourself the opportunity to do something around the house.
DIY children's busy board for children
Busy boards are very popular among parents and children really like them. And this is not without reason. If you have kids in your home, then you simply need a bodyboard for children; we highly recommend making one; you will be surprised how diligent and focused a child can be.
Busyboard - educational house
The voluminous item is suitable for children over 2 years old. It develops the baby's tactile sensations, imagination and thinking. If you want to construct one, you will need carefully prepared, smooth boards. They must be connected to each other in the form of a cube, using self-tapping screws and bars. Make an original roof for the house, cut out doors and windows with a jigsaw. Secure them with loops.
Busy board in the shape of a house
Busyboard castle
Decorate your “building” with chains, shutters, latches, and locks. The options can be any - it all depends on the age and preferences of the baby, his abilities and skills.
Photo: bodyboard cube
What is a busy board and its types
A busy board is a smart game board on which various elements are located that do not pose a danger to the child. All the parts on the board can be touched, stroked, and some of them have special abilities - they click, move, glow, open and close, and make sounds.
The business board was invented by teacher from Italy Maria Montessori, who promotes the theory of raising children based on independent knowledge of the world through the senses. The development board may include various elements - light bulbs, buttons, switches, buttons, scraps of fabric, fasteners, abacus, sockets and plugs not connected to electricity.
There are different types of bodyboards, which differ according to the age and gender of the baby:
- Soft developmental bodyboards. They are suitable for babies up to one year old. They are made in the form of a book, pillow or rug.
- Solid bodyboard without sharp corners or dangerous small parts. This toy is intended for children under 2 years old. The choice of product theme depends on the preferences of the baby. It could be animals, clothes, nature.
- Boards in the form of castles, houses, cubes or cars. They will be of interest to children 2-3 years old, because in order to open the toy, you need to deal with the lock.
- Large educational boards. You can put numbers, letters, syllables on them, and also supplement the toy with tasks and puzzles. Preschool children (3-6 years old) will like this busy board.
While playing with a busy board, the child not only learns about the world, but also develops various skills that will be useful to him in the future. This is an excellent option for developing fine motor skills, logical thinking and memory.
See also:
How to make a cardboard box with your own hands - step-by-step instructions