At first glance, it may seem that sewing a baby envelope for a newborn for discharge is quite difficult, due to the presence of various decorative elements on it and its unusual shape. Therefore, many people prefer not to bother with this matter and buy a ready-made envelope for discharge.
Actually this is not true. If we proceed from its standard size and the mandatory elements that must be present on it, without any intricacies of creative thought, then this can be done quite easily and simply, having at hand a sewing machine, scissors, a needle and thread, pins and a measuring tape.
And of course, the material itself from which you need to cut and sew an envelope for the baby.
We will demonstrate step by step how to cut out and sew a standard baby envelope with lace with your own hands, which will include: a blanket measuring 100 cm by 100 cm, a bow and a fastening belt.
The design of such an envelope itself will largely depend on the quality and appearance of the material that will be used to sew it.
How to sew a corner for a newborn
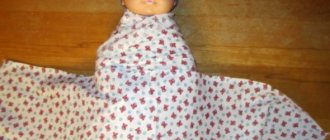
The need for a corner for the baby appears when he is expected to arrive from the maternity hospital. A corner is not only a decorative accessory, but also hides a small face from prying eyes and the wind. A beautifully crafted corner with lace is a wonderful gift for a baby.
Of course, you can buy this product in every baby store. But it will be much nicer if the child’s future mother or grandmother makes a corner for a newborn with her own hands. Having studied the necessary information, sewing will not take much time. The corner can be called the baby's first outfit for going out.
Let's start making the corner
Any fabric will do: beautiful, elegant, bright, but with a good environmental composition. It is better to give preference to fabrics that do not fade when washed. More often the corner is sewn from cambric, jacquard, calico. This fabric already has embossed patterns, which will give the finished product a unique beauty. You will need two rectangles 37 cm by 35 cm.
Not so long ago, it was customary for boys to choose blue shades. And the little ones were wrapped in pink. But modern mothers often settle on white, or on a colorful children's drawing. You can sew a corner from satin, wool and silk. For beauty and tenderness, lace and ribbons are used as decoration. The choice will be up to the woman herself.
The pattern can be found in sewing magazines and on the Internet. The fabric is folded in half along the grain, the pattern is placed in the middle of the fold. When a child is born in winter, when the corner will be used during the same period, you can add insulation. The insulation pattern will be the same. The lining is cut along the line where the fastener is located. It will have two parts with seam allowances. The lining fabric should be folded along the grain.
When decorating with lace, it is attached to the front part of the product. To the rounded corner, along the contour, you need to sew a lace ribbon. We first outline it. To save lace, it is often not sewn anywhere except the corner itself. Then you need to make small cuts in the corners of the envelope and turn it right side out. We sew the seams along the line of the fastener, while the lining fabric is tucked 3-4 centimeters. You can use ties, buttons or a zipper as fasteners.
To sew a corner for newborns with your own hands you will need about one and a half meters of fabric and the same amount of tape
When making a corner yourself, special attention should be paid to fabrics. They must be natural
Of course, the finished product must always be kept clean.
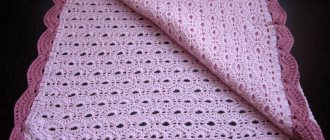
DIY lace envelope
The first thing you should decide on is the fabric that will be used when sewing a lace corner for a newborn.
Typically, natural textiles in white or any other neutral color are used for this purpose.
An excellent solution would be to use chintz or calico for these purposes. You can decorate the envelope with embroidery along the edge (white threads on white fabric), or with delicate ready-made lace. The size of the future corner should correspond to the parameters of a regular diaper. Typically the dimensions chosen are 0.9 x 1.1 m (or 1.2 m).
For beauty, you can slightly round the edge of the envelope. Decide in advance what kind of lace you want to see on your corner as a border. Some women prefer classic embroidered lace, others take guipure fabric and sew it in the form of ruffles. In both cases, the envelope will look elegant and sophisticated.
You will definitely need a simple pattern that you can easily handle on your own. It does not include complex small details, so you should not be afraid, even if you are dealing with cutting and sewing for the first time. However, in this case, we still recommend that you practice on the “draft” version, or ask a knowledgeable person to help you.
Stages of making a corner:
- Open your pre-purchased diaper. A variety of patterns for a particular fabric can be easily found on the Internet by looking at websites and portals for needlewomen. Carefully cut the required size from the fabric or “tear” it along the transverse and longitudinal threads;
- Stitch the resulting product along the edges using an overlocker, zigzag, or by hand. It is better to work directly on a sewing machine - this way the result will be more attractive;
- Choose a rounded corner that will cover your baby's face. Now cut out the required amount of lace and sew it on. A strip of lace can also be placed along the entire contour of the envelope. However, in order to save money, the “dressy” part is sewn only on the rounded corner, and the outline of the rest of the fabric remains overlocked (which is why we have already said that the edges should be sewn on a machine initially);
- Now iron your corner thoroughly.
Experienced craftswomen practice decorating an envelope by spreading the fabric to the width of the lace.
This technique makes the finished product even more airy. It is not advisable to fold the fabric, so lace or another element of decoration is placed on the overlock fabric and sewn on using a regular machine stitch.
When making a standard corner for a baby, it is important to remember the naturalness of the fabrics and the cleanliness of the finished product.
It should be emphasized that you will need such a “basic” envelope in any case, even if you plan to purchase or sew an insulated corner. You wouldn't put your baby in wool, would you?
Children's blankets made from motifs
Beautiful and unusual models are obtained from motifs (squares). In addition, it is difficult for beginners to crochet a large, bulky item; it is much easier to make several small motifs and combine them into a single fabric.
Blanket for a newborn using the Granny Square technique
The good thing about this product is that it is not necessary to buy many skeins of new yarn; you can use the balls that are left over from previous projects. The more different colors, the brighter and more interesting the model will be.
- Threads of different colors, but of the same thickness and fiber structure - 1800 g (for a blanket with dimensions 110 cm x 130 cm). For a newborn, you can make a smaller model, but it’s better to work hard and knit a blanket “for growth” so that it will last the baby more than one year.
- Crochet hook No. 3.5-4.
- Sewing needle, scissors.
How to knit "Granny Square"
Knitting patterns can be used in different ways, but for beginners it is better to choose simple motifs that will definitely not cause difficulties.
Work begins with an air loop (you will need 4 of them).
Next, knit 3 tbsp. double crochet + 2 air. loops. The combination is repeated 4 times and is completed by connecting the last loop to the first stitch, according to the diagram.
The next row is knitted from 5 tbsp. double crochet +2 tbsp. double crochet loop of the first row + 2 air. loops + 2 tbsp. with a double crochet in the second air. loop + 2 double crochets. We knit the combination 4 times.
Next we knit 7 tbsp. double crochet + 2 tbsp. double crochet loop of the second row + 2 air. loops + 2 tbsp. with a double crochet in the second air. loop + 4 tbsp. double crochet The combination is also repeated 4 times.
https://youtube.com/watch?v=IX1cPvtxWUc
To join the knitting and make the seam invisible, you need to use a sewing needle.
The first square is ready.
All subsequent squares are knitted in exactly the same way. For a blanket measuring 110 cm x 130 cm you will need 221 pieces.
When all the blanks are sewn together, the blanket can be considered ready.
For knitting, you can also use this simple pattern:
Using this scheme, you get the following squares:
Crocheted children's multi-colored blanket from squares
The pattern is even easier to knit than from the “Granny Square” motifs. No diagram required. Squares of the required size are simply knitted with single crochets. For a blanket measuring 125 cm x 125 cm you will need 100 pieces. squares with a side of 12.5 cm.
- Various yarns – 1500 g.
- Hook No. 4.
- First the squares are knitted. The quantity can be as in the master class; if you need a larger or smaller blanket, then the number of motifs changes.
- Then you need to connect the squares together with a hook or needle in any usual way.
An original blanket for a newborn using the woven fabric technique
The size of the blanket can be varied by adding squares or changing the width and height of the motif.
- Yarn of different colors, but the same structure - 1500 g.
- Hook No. 3.
- Hook No. 6.5-7.
- Sewing needle.
1. The basis of the product is 9 or more squares, which are knitted with a “loin mesh” pattern. The pattern is simple and is done with double crochets, alternating with air loops. At the beginning of each row, 3 air movements are made. lifting loops. You will need to knit 9 squares with a width of 40 cm for a product with dimensions of approximately 125 cm x 125 cm.
2. To imitate a woven fabric, you will need to pass threads or cords knitted from air through the holes in the base of a contrasting color. loops The length of the cords depends on the chosen pattern; it is better to measure the pattern in advance, pinning the cords with pins.
3. When making a design, the beginning of the thread or cord must be secured with a sewing needle.
4. It is convenient to pass the cord using a large crochet hook. The end of the cord is also secured with a needle.
5. This is how you need to decorate all the squares. It’s better to choose a different pattern – it will be more interesting. The colors of the cords should be bright.
6. Finished squares can be connected in any way, for example, with connecting posts.
7. To make the blanket look elegant, it is good to tie it with a “shell” pattern. The tying begins from the corner of the fabric (single crochet, three loops are skipped, from 4 loops there are eight stitches with two crochets, the pattern is repeated the required number of times).
Choosing an envelope depending on the gender of the child
Envelope for children - the pattern is selected not only according to the time of year, material, but also according to the gender of the child. If you believe the signs, then an envelope that is correctly selected for a boy and a girl will help them develop faster and get on the right path. Otherwise, the boy will be feminine and the girl will be masculine.
For girl
The fabric should be either white or in warm, light, pastel colors. It can be peach, soft pink, caramel, purple, lilac, coral, yellow and so on. It is fashionable to decorate with lace, sparkles, and rhinestones. At the bottom of the envelope, as a rule, they tie it with two pink ribbons, so that it is immediately clear that it is a girl. You can also decorate with different stickers and bows.
Beautiful - for my dear baby
This season there is a fashion for children's envelopes with stickers and sewn-on designs. For a girl it can be angels, the sun, flowers, butterflies, princesses, hearts.
Stores sell craft kits and decorations. The master can suggest how best to decorate this particular envelope.
You might be interested in this. Pattern of a children's and adult's hat: sewing order
For boy
The boy is the future man, the head of the family. He must be strong, courageous, resilient, smart and rich. His envelope should be in cool colors, mainly blue, light blue, dark purple or white, a standard color. You can decorate it with different designs in the form of cars, boats, tanks, balls and so on.
To ensure that everything is always good financially in a child’s life, relatives or parents put money in the hood.
For a boy
There is also a tradition that a seal cut from the extract is placed in an envelope created for a boy or a girl. You can also put a tag that indicates the date, name, height, weight and everything else.
Safety is the first criterion for evaluating an envelope
The complete helplessness of the baby makes us care first of all about his safety. Possible risks:
- slippery fabric. If it is inside the envelope, the child may fall out of it; if it is outside, you risk losing the package from your hands;
- synthetic materials. Direct contact of a newborn's skin with synthetics is undesirable. Artificial fabric creates a “greenhouse” effect, can cause irritation, and increases the risk of developing allergies;
- ill-conceived design in which the envelope can unfold/unzip;
- poor quality of fittings and materials in general - for example, fading fabric or fluff coming out of the lining.
Note! Before purchasing a product, it is important to inspect it, taking into account the above criteria. If you plan to sew an envelope for discharge and for future use, then you should pay maximum attention to the selection of materials and patterns and read reviews about certain models.
This is interesting: Pattern Sets for babies (sizes 0-18 months)
Materials and cutting
Materials (purchased/consumed):
- Raincoat (1 m/0.75 m).
- Fleece lining (1 m / 0.7 m).
- Alpolux insulation 200 g and 100 g approximately 0.7 m each.
- Lock 50 cm - 2 pcs.
- Eyelets - 2 pcs.
- Clamps - 2 pcs.
The pattern was made on the basis of model 4 from the magazine Ottobre 2004 No. 4, but I did not make the legs and arms, I rounded these places.
We cut out the upper (from raincoat fabric) taking into account an allowance of 1.5 cm and the lower (from fleece) parts taking into account an allowance of 0.5 cm (since the lining fleece on a knitted base is very stretchy):
- Back - 1 child.
- The middle part of the shelf is 1 child. with a fold.
- Side parts of the shelf - 2 children.
- Side part of the hood - 2 parts.
- The middle part of the hood is 1 piece.
- Front strap - 1 piece + 1 piece. (there are two of them in the pattern, probably to choose the length, I chose the shorter one).
- Edge - 1 child. (you can do without it).
- Locking facing in frame - 2 pieces. (we cut it out, applying the side part of the front, draw a line from the neck to the line, just below the mark, then from this line we put 3 cm in one direction or the other, we get a curved strip).
- Windproof strip - 1 piece. + 1 child. (we cut it out by applying the central part of the front and circle it on one side to the mark, draw the upper part arbitrarily).
We cut out parts from insulation. Place the top parts on 200 g of insulation and cut without allowances. Then place the lower parts on insulation 100 (except for the hood) and also cut them without allowances. Next, baste the insulation to the parts along the edges so that it does not move (you can sew it on a machine).
Step-by-step instruction
Step-by-step master classes will help you figure out how to sew an envelope for a newborn. Separately, it is worth considering the process of manufacturing the summer and winter versions.
Summer model
There is nothing easier than sewing an envelope for discharge using this technology. The work will take a minimum of time, and the end result will be a beautiful blanket. For the outer layer in this case, satin or jacquard is perfect. The interior is made of thick cotton fabric. The size of each canvas is 135x80 cm. The pattern is transferred to graph paper and only after that the sewing process itself begins.
The paper template is fixed on the canvas with pins and outlined. Be sure to include seam allowances. After this, the workpiece is cut out.
The outer and inner parts are sewn together.
Frills are sewn onto the product.
The edges are processed using an overlocker and decorated. For example, you can place a picture of a giraffe on it to make the children's sleeping bag much more attractive. If desired, you can additionally sew on ribbons.
Winter model
It won’t be difficult to make an envelope for a newborn with your own hands for the winter. In this case, preference is given to materials such as raincoat fabric, denim or plush. These fabrics are used for the upper part of the product. The middle layer is holofiber. Flannel is used for lining. You will also need buttons, a pair of zippers and an elastic band.
A pattern is made on graph paper and all parts are cut out taking into account seam allowances.
All three layers are connected and stitched using a sewing machine.
Zippers are sewn into the sides.
Buttons are fixed at the top. All three of these elements must be on the same side. Then loops are made from elastic. When the buttons are fastened, a hood will form. You can also use a zipper in this part.
All that remains is to decorate the resulting product at your own discretion.
These are not all the ways to make a discharge blanket. For example, a knitted envelope for discharge would also be an excellent solution. To create it, you just need to find a description of the knitting and you can start working. Knitting will allow you to create an incredibly beautiful and original product.
Which is better: an envelope or a jumpsuit?
When choosing your baby's first clothes, the time of year plays a big role. Envelopes are made with Velcro, ties or snaps.
The advantages of the envelope include:
- ease of use;
- easily turns into a blanket;
- makes the baby motionless, which eliminates the risk of turning over on his stomach and the possibility of suffocation.
When the child begins to hold his head up and become interested in the world around him, the envelope will be inappropriate. It’s better to pay attention to the overalls; they can be used longer. Jumpsuits are often made universal: everything is secured at the bottom with buttons, and a zipper is sewn between the legs. It is used when the baby begins to walk.
Knitting patterns
For winter, a thick baby envelope that will retain heat well is ideal. When knitting a product, you can combine garter stitch with rhombuses. For the summer you can knit an openwork model. A product with braids is useful as a daily option. Knitted discharge envelopes for newborns with a pattern can be made according to this pattern.
Braid pattern
Symbols for the diagram:
- White square - knit with facial loops in the front rows or purl on the reverse side;
- White circle in a square - knit with purl stitches in the front rows or knit stitches on the reverse side;
- Black circle in a square - knit with purl stitches in the front and back rows;
- Arrow to the right - interception of 4 facial loops with the loops slanting to the right. The first and second need to be removed onto a separate knitting needle while working. First knit the third and fourth loops, and then all the removed ones;
- Left arrow – interception of 4 knit stitches with the loops slanting to the left.
Braid pattern, diagram
During the process, you should follow the instructions for the correct set of loops, first learn how to close them correctly at the end of knitting.
Set of loops step by step:
- Unwind the required amount of yarn from the skein.
- Insert two connected knitting needles into the thread located on the thumb of the left hand.
- Grab the working thread and pull it into the resulting loop.
- Pull your thumb out of the loop and tighten the thread on the knitting needle, spreading your thumb and forefinger.
- With the thumb and index finger of the right hand, they grab the resulting loop and, moving towards themselves, begin to knit further.
- Tie the two threads together with a knot.
Knitting process
Using the right needle, knit two stitches together and put them back on the original needle. Repeat the process.
Hooded
A knitted discharge envelope for a newborn can be knitted with a hood. In order to make the front part of the product, you need to cast on 122 loops on the knitting needles. Work 4 rows in garter stitch, then rib 20 rows and repeat 4 rows in garter stitch.
Then continue according to this scheme:
- 10 loops – garter stitch;
- 102 loops - with the selected pattern;
- 10 loops - garter stitch.
Thus, you will get a smooth canvas 50 centimeters long. To knit the back, you need to mark the starting row of the back with chalk, then knit an even fabric. In every twentieth row, do not forget about the holes for buttons on both sides in the area where the garter stitch is. To do this, you need to cast off three loops in the middle of the section, and cast on three loops above them in the next row. There should be 4 holes on each side. Continue knitting until the length of the back is equal to the length of the front of the envelope. You need to knit approximately 28 rows. To create a hood, continue knitting another 15 centimeters. Next, fold the hood in half and sew it with a knitted seam. You can use a hook to connect the sides.
Envelope bag
This product is very easy to knit, you just have to follow the detailed description.
Back:
- To knit the back, you need to cast on 72 loops on the knitting needles and knit in accordance with the chosen pattern.
- When the fabric reaches 48 cm, close the 4 cm loops on both sides of the back for the armhole.
- Next, knit another 16 cm and finish knitting.
Front end:
- Start knitting 20 cm from the cast-on edge of the fabric, bind off 4 loops and finish knitting separately.
- In order to round the neckline, you need to decrease five stitches in every second row.
- After 5 cm of fabric, finish knitting.
Hood:
- To knit a hood, you need to cast on 78 loops and knit an elastic band two centimeters long.
- Add six loops and follow the selected pattern.
- After 9-10 cm, close 24 loops and finish knitting.
The knitted bag for a newborn is ready.
Blanket envelope
To get such a product, you need to knit a long rectangle with knitting needles. Its length should be sufficient to place the baby on it and cover it from above. When the fabric is knitted, you need to sew it on the sides, you can tie the hood, and add three centimeters of 1x1 elastic to the sides and make a button closure. The difference between these products is that they are knitted straight and without sleeves.
Note! When the child grows up, you can rip out the side seams and use this envelope as a blanket
Pattern of an envelope for a newborn
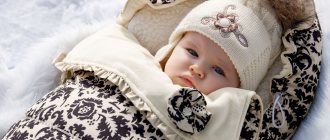
There are 2 types of envelopes: for everyday use and for discharge. The product for discharge is a beautiful “cocoon”, decorated with a bow or ribbon to match the color of the child’s gender. Often the product is equipped with various decorative elements: embroidery, ruffles, etc. An elegant accessory creates a festive atmosphere for everyone present and allows you to take the first photographs of the newborn as a keepsake.
An everyday envelope is a cozy outfit for a baby, designed for walking in a stroller, transportation and sleep. It is rarely decorated with a variety of decor, so it looks simple and unpretentious. The main task of clothing is to provide the baby with health, maximum comfort and coziness.
In principle, the pattern for a holiday accessory is no different from an everyday one. It all depends on the decor. For decoration use a satin ribbon. It is enough to wrap it around the product once and tie it in a lush bow to make the product look elegant. Girls choose a pink ribbon, boys - blue.
What is a corner for a newborn and what is it for?
The corner is a special diaper, decorated with lace and embroidery. The baby is wrapped in it before being placed in an envelope. The decorated corner of the diaper remains out to cover the baby's face from bad weather or prying eyes.
Today, special corner diapers are sold not only for discharge, but also for baptism of the baby. You can buy it ready-made, or you can make it yourself if you put in a little effort.
If the discharge takes place in the summer in the heat, then a beautiful corner diaper is enough to wrap the baby, and an additional insulated envelope or blanket is not needed. This baby diaper will be useful in the future when caring for a newborn, for example, during visits to the doctor or for home use. If you use it at home, then it is better to remove lace and other hard decor to make the baby more comfortable.
How to decorate an envelope
Standard decorations are voluminous bows and satin ribbons. Bows are made from different fabrics, decorated with pearls or embroidered with beautiful threads.
How to decorate:
- Envelopes are decorated with lace, laid in several layers.
- Flower petals are created from satin ribbons, which are then sewn together, complemented with beads or rhinestones.
- Designs intended for fabric are purchased. They are glued, sewn or attached using heat.
- Thematic envelopes are gaining great popularity when they make bunny ears or an envelope in the form of a kinder surprise.
- Small decorative pompoms are sewn along the perimeter of the envelopes.
The stores offer standard sets, but handmade items are more relevant and original. A person can choose the design down to the smallest detail. The price is more expensive, but the performance and appearance are worth the money.
Article design: Svetlana Ovsyanikova
Baby craft with terry center
This blanket will require two types of fabric and a ribbon to decorate the outside of the blanket. The inside of this blanket is special, it is made of cotton terry fabric. This one is sold in fabric stores marked for children. You can use a baby blanket for this part of the blanket.
Cut a long strip 12–15 cm wide from the facing fabric, fold it in half lengthwise and stitch along the cut edge. Now sew the resulting ribbon by hand to the square piece of fabric using a simple seam. Lay a piece of outer fabric face up on a flat surface. The resulting tape is placed on it along the perimeter of the fabric so that the seam of the tape coincides with the seam of the fabric, and its free part lies on the fabric and not around it. As you sew, gather the ribbon into large or small gathers.
Now you need to separately make a part for the inside of the blanket. To do this, cut a square of terry cloth smaller than the size of the future blanket. The difference should be 10 - 12 cm from each side. Complete the missing length with a second fabric, sewing it in strips around the perimeter of the terry square.
If desired, one corner of the blanket can be made rounded. In this case, make a rounding on the corresponding terry piece of fabric in advance.
Connect the padding polyester together, and on top two pieces of fabric, folded facing each other. The pre-sewn lace should be inside between the layers. Connect all the parts together with needles or pins and sew on a sewing machine, retreating one centimeter from the edge. Leave the window unsewn, turn the blanket through it and sew it by hand with a blind stitch.
If you want to see a pattern on the front of the quilt, make it in advance before you start sewing all the pieces together. As a pattern, you can use a thin satin or decorative ribbon, stitching it to the front fabric.
Envelope for discharge
Newborn envelope - a warm blanket in the shape of an envelope to protect the baby from bad weather conditions and other things. In the first months of life, it is necessary to protect the baby from everything: strong wind, sun, snow, rain - all this can affect the little person’s immunity.
For a newborn
In addition, this is the most convenient device. Today there are models with a hood, zippers, zippers, and straps so that you can wear them not only on your arms, but also on your shoulders, back or stomach.
Models and patterns
The first criterion by which extract envelopes differ is seasonality. Such products are not only summer and winter, but also inter-seasonal. It is important to remember that the thermoregulation system in newborns is not formed, so clothing must be chosen correctly. Also, a children's summer or winter envelope for a newborn differs in shape.
There are several types of envelopes:
- Blanket. The most standard option. By folding the fabric you can get a warm envelope for the baby and then tie it with ribbons. Satin products are most often chosen, but cotton blankets are considered more practical because they do not slip.
- Bag. The device is similar to the previous version and also does not have sleeves. The only difference is that with this design a zipper is sewn into the side. A bag envelope is more practical because it eliminates the possibility of cold wind.
- Cocoon. It looks like a bag with a hood, but it has places for handles. The legs remain completely covered. The advantage of such a product is that the new mother does not have to turn up corners and tie ribbons.
- Transformer. Such a product visually looks like an ordinary jumpsuit, on which many zippers or rivets are sewn. If you zip them up, you get a warm, windproof envelope. As the baby grows, the transformer for a newborn can be used as outerwear. All that is required is to unfasten the buttons, resulting in a model with arms and legs. This is the most practical option, since the child can wear it all season.
In the absence of experience, novice craftswomen are advised to focus on simple models, such as a blanket envelope or a bag. Each of these options is universal, suitable for both summer and winter discharge. When sewing, it is worth considering that the sizes of such products differ from each other and directly depend on the weight and height of the child. In order not to make a bad choice, it is recommended to make an envelope of a standard size - 75 x 42 cm.
Most modern manufacturers produce products not according to height, but taking into account the weight of the baby. Conventionally, there are 3 sizes of envelopes for discharge: intended for children weighing from 2.8 to 3.3 kg, from 3.3 to 3.5, from 3.5 to 5 kg.
Cocoon
Bag
Blanket
Transformer
Fabric selection
An envelope for discharge from maternity hospital is a product designed to protect the baby from wind and cold. A few decades ago, a regular baby blanket was used instead, which was rolled up and tied with a satin ribbon. When making an envelope for a child, you need to take into account the following points:
- at what time of year the discharge will take place;
- gender of the baby.
The main criterion that must be taken into account when choosing a material is that it must be hypoallergenic and safe. It is best to give preference to natural fabrics. It is especially important to adhere to this rule when choosing material for lining the product. A light summer envelope for a baby can be single-layer or with a lining.
Most often the following materials are used for manufacturing:
- cotton fabric – does not cause allergies and does not interfere with air circulation;
- satin - a smooth fabric woven from 3 threads, has increased strength;
- calico is a strong material that allows air to pass through;
- poplin is a natural fabric that is hard to the touch.
If desired, each of these materials can be used to sew an envelope, since they are safe for newborns and are guaranteed not to cause an allergic reaction upon contact with delicate baby skin.
Since summer is not always hot, it is recommended to make a lining in advance in case of cool weather. It is best to use holophane, which is an analogue of isosoft, as insulation. If desired, you can add a second layer of calico, which will prevent blowing.
Winter envelopes consist of two parts - an outer part and an inner part with a lining. The top layer of the product is sewn from warm, dense material. The following fabrics are most suitable:
- plush;
- fleece;
- grass;
- artificial fur.
Also, some mothers use satin to sew the outer part. For the inner layer, it is best to choose flannel - a safe hypoallergenic fabric. It is recommended to take as insulation:
- padding polyester;
- fluff;
- holofiber;
- sheepskin;
- bamboo fiber.
Each material has its own advantages and disadvantages. You need to choose fabric according to individual preferences and financial capabilities. To give the envelope a festive look, use ruffles, frills, and ribbons. Also, such a product must be equipped with special fittings: zippers, rivets, Velcro. If desired, you can tie the envelope with a regular satin ribbon.
As for color design, the most common shades for children's envelopes are pink, blue, white, lilac, and gold. The last three options are universal. They are suitable for both boys and girls. The only thing that is not recommended for sewing a discharge envelope for a newborn is fabrics with complex patterns and colorful prints.
Calico
Plush
Poplin
Satin
Fleece
Cotton