A little man who has just seen the light also needs clothes. At home he can be in diapers, but after a few days he will have to go outside, where the baby must be well dressed: in the summer - for beauty, at other times - also for warmth. Therefore, before knitting a suit for a newborn, you need to choose the right tools and materials.
How to actually knit a costume for a newborn
Based on the calculations obtained, we begin to knit pants with a breast from two parts.
If you are knitting for your baby, the work can be adjusted in length. When the butuz quickly gains weight, it is advisable to knit loose trousers so that the suit does not end up being too small by the end of knitting. We start knitting from the bottom. First, the trouser legs are knitted: each separately. Without closing the loops, we connect both parts on one knitting needle and knit the continuation together. This way both halves of the trousers will be on one piece. At the waist, if desired, we make an elastic band. The back part does not have to end with a solid back, since we will also have a blouse. It is advisable to tie it to the baby’s armpits; you can knit the last 5–6 rows with an elastic band and close the loops. You can not close all the loops, but only those that are not needed for the straps. If you have determined the location of these stitches from the pattern, then leave open loops there in the required quantity on additional knitting needles or special pins for Aran knitting.
Now knit the front piece. It is good to provide a fastener in it, so it is worth knitting a few centimeters after connecting the halves of the trouser legs, and then again dividing the knitting into two parts. If you want to insert a zipper, close 3-4 loops in the middle of the work (this depends on the pattern). If you plan to fasten with buttons, this omission is not necessary.
A properly knit suit for a newborn should fit well even without a fastener, so you can make a solid front piece and sew them together with the back one. For this, a knitted seam is best, as it turns out flat and does not rub the baby’s delicate body. When the parts are connected, we return to the stitches, remove them from the additional knitting needle and knit them in stockinette stitch to a length so that there is enough room for a loop. It is rational to knit the strap a little longer and make three levels of loops on it. For the loop, you need to make a yarn over instead of the middle loop, possibly in two rows (depending on the density of the knitting). If you make several loops, then as the child grows, you can adjust the vertical size of the pants with straps.
The blouse is also knitted from the bottom and begins with a small 1x1 rib. Knitted in one large piece and two sleeves. The baby does not need a round armhole, so when the main part is knitted to the level of the armhole, we simply divide the work into three parts. At the armhole place we close three loops. We remove the shelves using additional knitting needles and knit the back, ending with a small elastic band. Then we knit the shelves and decrease the loops in place of the neck. Next, the neck can also be finished with a small elastic band. For a girl, you can knit a beautiful frill along the neckline.
The sleeves are made in separate parts, starting with an elastic band. They are sewn to the armholes and also sewn with a knitted seam.
Along the edge of one of the shelves you need to pick up edge loops and tie an elastic band, making loops using yarn overs. On the other shelf, in the appropriate places, sew buttons.
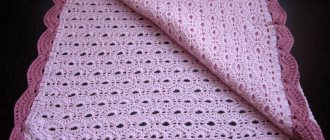
Knitting a costume for a newborn is not limited to just pants and a jacket. It’s good to knit accessories: booties, scratchy mittens, a hat. A set for a 3–6 month old child may well look like in the photo:
You can also learn how to knit a costume for a newborn using video instructions using the appropriate video:
Here we consider a model with pants without a breast, but the blouse has a hood. The model is knitted with a complex pattern, but with detailed instructions from the craftswoman this work is easy to do.
And most importantly: since the items are small in size, you can knit them quite quickly. Knitting for a growing baby is a pleasure, and besides, seeing your beloved baby in exclusive things made with your own hands.
We knit a wonderful new thing for a little girl 4-5 years old
A wonderful knitted costume for a 4-5 year old girl is shown in the following photo. It consists of a tunic sweater and gaiters. In addition to the costume, you can also knit a hat. Such a cute outfit will add charm and brightness to the image of a little fashionista.
Suit size – 106. For work you will need acrylic yarn – 450 g, knitting needles No. 3, buttons (4 small, 3 large), elastic band.
Each of us associates childhood with our toys. So give your kids the cute knitted toys that we offer!
Main pattern:
Row 1: chrome, knit 2, purl 2, chrome.
Row 2 and all even rows are knitted according to the pattern.
3rd row: chrome, remove 1 p. at work, knit 1, knit the removed loop, purl 2, chrome. Repeat the pattern from the 1st to the 4th rows.
Elastic for cuffs: 1st row: edge, knit 2, purl 2, edge;
Row 2 and all other rows: purl. knit the loops purlwise, knit the front loops as follows: slip 1 st at work, knit 1, knit the removed loop.
Knitting density: 17 loops X 27 rows = 10 X 10 cm.
We study every stage of our work on the product
Sweater. Back.
Knitting is done from top to bottom.
Cast on 7 stitches and knit stitches. satin stitch, while on one side in each 2nd row add 3 stitches once, 10 stitches once (20 stitches for the shoulder), in the next 2nd row add 7 stitches on the other side (for the neckline ), knit straight 2 cm and leave the work. Knit the second shoulder symmetrically and connect both parts, and then knit from one ball (= 54 p.). At a fabric height of 13 cm from the beginning of knitting, to form armholes on both sides, add 1 p. 2 times, 2 p. 1 time (= 62 p.) in each 2nd row. Next, to fit the product, decrease on both sides in each 4th row 1 p. 4 times (= 54 p.). Then continue knitting with the main pattern in the following order: chrome, purl 1, 50 sts. main pattern, purl 1, chrome. (there should be 2 persons in the center.). On the right and left sides of 2 persons. p. in the center in each 2nd row, add 1 p. crossed from the broach, introducing them into the main pattern, while on both sides along the side seams, decrease in each 2nd row 12 times, 1 p. Then continue to increase only in the center, due to which the flare will be formed. When the number of loops reaches 78, knit the added loops only from the outside. and after 6 r. close all 84 p. Front.
Cast on 7 stitches and knit stitches.
stitch, while on one side add in every 2nd row 1 time 3 stitches, 1 time 10 stitches (20 stitches for the shoulder). After 10 r. from the beginning of knitting on the other side in every 2nd row, add 1 p. 4 times, 3 p. 1 time (for neckline), then knit 2 cm and set aside work. Knit the second shoulder symmetrically and connect both parts, and then knit from one ball (= 54 p.). Continue knitting the piece in the same way as the back. Advice from sdelala-sama: a scarf is, first of all, a stylish accessory that adds volume and texture to many fashionable silhouettes. Sleeve.
Cast on 32 stitches on the knitting needles and knit with an elastic band for 6 cm cuffs. Continue working with the main pattern, while after the elastic band to form bevels on both sides in each 10th row, add 1 stitch 4 times (= 40 stitches).
Insert these added loops into the pattern. At a piece height of 22 cm from the beginning of knitting to form a sleeve cap on both sides, close in every 2nd row 1 time 2 p., 5 times 1 p., 1 time 2 p., 1 time 3 p. and 1 time 4 p. At a fabric height of 29 cm from the beginning of knitting, close off the remaining 8 stitches on the knitting needle. Knit the second sleeve in the same way as the first. Assembling a sweater.
Sew shoulder seams.
To decorate the collar along the edge of the neckline, starting from the back slit, raise 96 sts and also pick up 4 hinged loops for the fastener bar (= 100 sts) and tie 10 cm with an elastic band for the cuffs, and make a platter for the fastener bar. viscous. While knitting the straps, make 4 holes for the buttons: in the faces. row 2nd and 3rd loops from chrome. knit together, yarn over, and then knit according to the pattern. Place the holes in the 2nd row from the beginning and with an interval of 2 cm from one another. At the end of knitting, close the loops. Sew buttons. Sew side seams and sleeve seams. Use 3 large buttons as decoration on the front of the sweater. Trousers. 1/2 part.
Cast on 40 stitches on the needles and knit 3 cm with an elastic band for the cuffs.
Continue working purl. satin stitch To expand on both sides, in every 10th row, add 1 stitch 9 times (= 58 stitches). At a piece height of 37 cm from the beginning of knitting for the step distance in every 2nd row on the left, close 1 time 2 sts, 1 time 1 st (front half) and on the right 1 time 2 sts, 3 times 1 st (= 50 p.). At a piece height of 57 cm from the start of work, close off 10 stitches in each 2nd row from the left edge. Knit the second half of the pants symmetrically to the first. Assembling the pants.
Sew the inside seams and the front seam of the pants.
Cast on loops along the top edge of the product and knit to form a 2 cm belt. satin stitch, purl 1 row. satin stitch and another 2 cm knit. stitch, and then bind off all the loops. Sew the back seam. Fold the belt in half and sew along the inside. side, pull the elastic band into it. Pattern:
Summer overalls for girls
To work, you will need approximately 250 g of cotton yarn 150m/50g, as well as circular knitting needles 2.5 mm and 3.0 mm, auxiliary knitting needles on which individual parts will be thrown.
Operating procedure:
Knitting starts with the legs. On 2.5 mm knitting needles you need to cast on 58 loops and close the knitting into a ring. Then knit 2 cm with a 1x1 elastic band.
After that, switch to larger knitting needles and knit a row in stockinette stitch, evenly adding loops so that in the end there are 64 of them. After that, switch to the pattern and knit according to the 4 cm pattern. Cut the thread, leaving a long end and throw the pant leg onto the auxiliary knitting needles. By analogy, knit the second leg.
- Place the first leg on the working needles and cast on 11 stitches between the legs and 150 stitches on the back. Place markers on new loops (4 pcs.). Close the knitting into a ring. Continue knitting according to the pattern, while making decreases in the center of the back and front.
- You need to decrease according to the scheme: knit the entire pattern to the outer loop in front of the marker on new loops, then remove the loop, knit one knit stitch and throw the removed loop over it, then knit 9 knit stitches, 2 knit stitches together and repeat the same on the back. Continue decreasing until there are 2 knit stitches left between them.
A great option for the summer is a knitted bodysuit.
Remove all the loops and place markers in the center of the back and front. Then decrease as follows: knit the pattern to the last two stitches in front of the central marker in front, then knit 2 stitches together, throw the marker over, slip off the loop, knit the next one and put the removed loop on it. Repeat the same steps from behind.
Decrease every other row until 102 stitches remain. After this, bind off 5 loops in the center in front (this should be the 3rd row of the pattern and must be closed with knit stitches), then continue knitting according to the pattern, turning the unfolded fabric back and forth.
After 31 cm of fabric is knitted, you need to put 2 markers, separating 23 loops of the shelves on both sides and 51 loops of the back. From the edges close 5 loops for the armhole.
Knit the sleeves separately. On 2.5 mm needles, cast on 36 stitches and close into a ring, marking the beginning of the row with a marker. Knit 2 cm with an elastic band and switch to 3.0 mm knitting needles. Knit a row of stockinette stitch with increases so that there are 41 stitches on the needles. Then knit 8 rows with a pattern according to the pattern. Cast off 5 stitches on each side of marker. Knit the second sleeve in the same way.
Another example of knitting an openwork jumpsuit for a baby
Assemble all the parts on the main knitting needles, so that the loops of the sleeves are located between the loops of the front and back. You should get 139 loops. Place 4 markers along the raglan lines. Knit in turning rows according to the pattern and at the same time perform raglan decreases.
To do this, you need to knit the pattern up to the last 2 stitches before the marker, then slip 1 stitch, knit the next one and throw the removed one over it, throw the marker over, then knit 2 stitches together with the knit stitch and continue knitting according to the pattern.
Make such decreases on all 4 lines. You should end up with 59 stitches left. After this, switch again to 2.5 mm knitting needles and knit 2 cm with an elastic band, and then bind off the loops.
For girls, the jumpsuit will fasten on the left side. To do this you need to knit the strips. On the left side, cast on 76 stitches on 2.5 mm needles and knit 2 cm of elastic, and then bind off the loops.
On the right side, also cast on 76 loops from the face and knit 4 rows with an elastic band. Try to make 5 buttonholes (cast off 2 buttonholes and cast on 2 new ones). The first stitch should be 4 stitches from the neckline. Knit another 2 cm with an elastic band and close the edge.
We create our own costume for babies 3-9 months old
If you have leftover yarn of different colors lying around in your bins, then you can put it to work by knitting such a bright striped suit for your baby with knitting needles. This model is suitable for both boys and girls, it all depends on what colors of yarn you use.
This costume is designed for babies aged 3-9 months. For work you will need: half-wool yarn of different colors - 450 g, knitting needles No. 3, No. 4; lightning.
Patterns: stockinette stitch, 1x1 rib.
Knitting density: 20 loops X 28 rows = 10?10 cm.
Description of the knitting process for beginners in needlework
Sweater. Back.
Cast on 64 stitches on needles No. 3 and knit 2 cm with an elastic band.
Then transfer the knitting to needles No. 4 and perform the face detail. satin stitch, changing the color of the yarn as desired after 2 or 4 rows. After knitting to a height of 33 cm, bind off all the loops. Shelf.
Cast on 33 stitches on needles No. 3 and knit 2 cm with elastic band 1?1.
Then transfer the knitting to knitting needles No. 4 and continue working on the face detail. satin stitch, changing the colors of the threads in the same sequence as on the back. At a fabric height of 29 cm, to form a neckline, bind off 2 times with 3 loops, 2 times with 2 loops and 2 times with 1 loop on one side. At a fabric height of 33 cm, close off the shoulder loops. Knit the second front symmetrically to the first front. To ensure that your baby is surrounded by care and warmth in autumn and winter, knit a charming baby blanket using knitting needles according to our master class. Sleeve.
Cast on 38 stitches on needles No. 3 and knit 2 cm with elastic band 1?1.
Then transfer the knitting to needles No. 4 and continue to work on the face detail. satin stitch, changing the colors of the yarn as desired after 2 or 4 rows. To form the sleeve cap, add 1 stitch on each side every 6 rows. At a fabric height of 19 cm, bind off 54 stitches at the same time. Sew the product along the shoulder lines. Hood.
Cast on 55 sts along the neckline of the left front and one half of the back piece.
Knit faces. satin stitch, changing thread colors after 2 or 4 rows. Perform additions every 6 r. on the right side, 1 p. At a fabric height of 26 cm, set aside knitting. Knit the second half of the hood symmetrically, first casting on 56 stitches along the neckline of the right front and half of the back piece. When both halves of the hood are ready, sew them together using a loop-to-loop stitch. Product assembly.
Sew the product along the lines of the sides and sleeves.
Sew the sleeves into the armholes. Along the edge of the shelves and the hood, cast on loops on needles No. 3 and knit 2 cm with an elastic band 1?1. Sew a zipper onto the jacket. Trousers.
Cast on 55 stitches on needles No. 3 and knit 4 cm with elastic band 1?1.
Next, transfer the knitting to needles No. 4 and work the knit stitch. satin stitch, changing the color of the yarn as desired after 2 or 4 rows. To widen the trouser leg, add 1 stitch every 5 rows on each side. When the knitted fabric reaches 24 cm, begin to decrease stitches to form a crotch seam. To do this, you need to close on each side 1 time 3 p., 2 times 2 p., 2 times 1 p. Then continue to knit straight without adding another 18 cm. To increase the crotch seam, you need to knit several rows on the back using the “partial knitting” method. . To do this, wrap the thread around the 30th, 20th, 10th loops. Next, knit another 6 cm of knits. satin stitch on all stitches. Close all loops. Knit the second half of the pants symmetrically to the first half. Assembly.
Sew the product.
Turn the top edge inside out. side and stitch. Insert rubber band. Pattern:
Photos of knitted overalls for newborns
Taking measurements from a newborn
Taking into account the characteristics of newborns, measurements are taken from them as follows:
- height must be measured with the infant lying down with legs extended, from the top of the head to the feet;
- the neck is measured around, through the 7th vertebra;
- placing the measuring tape horizontally under the muscle grooves and around the chest, find out its girth;
- the waist is measured in the same way, but in the area slightly above the navel;
How to take measurements from a newborn
- if you measure the torso by the protruding points of the buttocks, you can find out the girth of the hips;
- The width of the back is measured along the bottom of the shoulder blades, from one armpit to the other; the resulting value is always divided in half;
- the height of the armhole is calculated from the 7th vertebra along the ridge to the point at which the chest circumference is measured;
- The length of the back to the waist is determined by measuring the length from the 7th vertebra to the lumbar region;
- shoulder length is measured from the beginning of the neck (where the lines of the neckline and shoulder seam intersect) to the shoulder;
- The length of the sleeve is measured on a slightly bent arm, from shoulder to wrist;
- side length is measured along the lateral line of the leg to the foot;
- The length of the leg is determined by the inner side of the thigh;
- The length of the seat is measured along the sides of the hips, from the waist to the end of the buttocks.
From the table you can learn about the typical sizes of newborns:
| Size | Designation | 50 | 56 | 62 | 68 | 74 | 80 | 86 |
| Height | R | 50 | 56 | 62 | 68 | 74 | 80 | 86 |
| Bust | OG | 41 | 43 | 45 | 47 | 49 | 51 | 53 |
| Waist circumference | FROM | 41 | 42 | 43 | 44 | 46 | 48 | 50 |
| Hip girth | ABOUT | 41 | 43 | 45 | 47 | 49 | 51 | 53 |
| Neck circumference | OSH | 23,3 | 23,9 | 24,5 | 25,1 | 25,7 | 26,3 | 26,9 |
| Rear Neck Width | ShShz | 4,4 | 4,5 | 4,6 | 4,7 | 4,8 | 4,9 | 5 |
| Back armhole height | VPr | 9,1 | 9,8 | 10,5 | 11,2 | 11,9 | 12,6 | 13,3 |
| Back length to waist | DTS | 15 | 15,5 | 18 | 18,5 | 20 | 21,5 | 23 |
| Back width | Shs | 8,2 | 8,6 | 9 | 9,4 | 9,8 | 10,2 | 10,6 |
| Armhole width | ShPr | 4,1 | 4,3 | 4,5 | 4,7 | 4,9 | 5,1 | 5,3 |
| Chest Width | SHG | 8,2 | 8,6 | 9 | 9,4 | 9,8 | 10,2 | 10,6 |
| Shoulder length | DPl | 4,3 | 4,6 | 4,9 | 5,2 | 5,5 | 5,8 | 6,1 |
| The length of the sleeve | DR | 18,5 | 20,3 | 22,1 | 23,9 | 25,7 | 27,5 | 29,3 |
| Side length | DsB | 24,5 | 28 | 31,5 | 35 | 38,5 | 42 | 45,5 |
| Seat height | Sun | 13 | 13,5 | 14 | 14,5 | 15 | 15,5 | 16 |
| Leg length | DN | 11,5 | 14,5 | 17,5 | 20,5 | 23,5 | 26,5 | 29,5 |
A selection of ideas for knitting and crocheting a newborn's trousseau
Even an inexperienced knitter can knit clothes for a baby using patterns with descriptions or videos. The baby will need a blanket and envelope, a discharge kit, a suit and dress, socks and a hat, a bodysuit, a sleeping bag and various accessories for the crib.
Blankets, rugs, envelopes: warm, lace, summer
For knitting, it is better to choose the simplest patterns. A blanket made of wool with a beautiful “Putanka” pattern looks interesting, in which there is an alternation of knit and purl stitches, i.e. knit, purl, knit, purl, knit, purl. etc. The first row starts with a knit stitch, rows 2-3 with a purl loop, and rows 4-5 with a knit stitch again. Then knitting rows 2-5 is repeated.
To knit a blanket or blanket, you need to cast on the appropriate number of stitches:
- several rows are knitted in garter stitch;
- in order to maintain a clear perimeter, each row must begin and end with as many knit stitches as the number of rows knitted in garter stitch at the beginning of the work;
- then the rows are knitted with the “Putanka” pattern, in which the loops alternate alternately – knit, purl;
- continue knitting until the blanket/plaid is knitted to the desired size;
- The final rows are also done in garter stitch.
A knitted envelope-blanket or cocoon (sleeping bag) is very practical to use. Standard sizes for newborns are 42x75 cm. But you need to focus on the season. For winter, you should take a larger envelope so that it can comfortably accommodate your baby in warm clothes. An envelope option in the shape of a sleeping bag is presented below.
Maternity hospital discharge kits
When a mother and her newborn go home from the maternity hospital, this is a special event that will require a special discharge kit. It may consist of a blanket or envelope, the descriptions of which are presented above, as well as overalls, socks and a hat. Instructions for knitting a hat and socks will be below, but now we will knit a jumpsuit for discharge.
To create a simple jumpsuit, cast on 38 stitches using size 3 knitting needles. Then:
- Knit with an elastic band 1x14 cm.
- Knit the fabric with a garter pattern, adding a loop in every 5th row.
- Having knitted up to 16 cm, make a bilateral decrease along the crotch seam - 4 loops, 2 and one at a time.
- The second leg is knitted similarly. Slip the stitches of both legs onto circular knitting needles and knit 5 cm of fabric in stockinette stitch.
- Divide the front loops in half to knit two separate fronts.
- Knit the central part of the product up to 23 cm.
- Work the front fronts and back separately, decreasing the stitches, make the armhole and knit the sleeves separately.
- Connect the parts of the overalls.
For boys, you can make an applique in the shape of a car or an airplane, and for girls, decorate it with openwork inserts or embroidery.
Suits for boys
It is recommended to knit suits for newborns that are looser, because underneath they will already be the child’s underwear. Particular attention is paid to the choice of yarn - it should be soft and hypoallergenic. It is more convenient to knit a blouse with raglan sleeves.
- Cast on 40 stitches on the needles.
- Knit 2 cm with 1x1 rib.
- Divide the fabric into parts using markers so that it looks like this: 5/2/5/2/12/2/5/2/5 loops.
- Before and after raglan, yarn over stitches are added in rows on the front side until the knitting reaches the armpits.
- The sleeve loops are transferred to other knitting needles and knitted to the required length, completing the work with 2 cm of elastic.
- Having finished knitting the back and shelves, all the parts are sewn together, buttons are sewn on, washed and steamed.
For panties you will need stocking or circular knitting needles.
Cast on 40 stitches on the knitting needles and knit them with an elastic band, distributing the work equally among 4 knitting needles:
- Knit 11 rows with an elastic band and 9 with the stocking technique.
- Make increases by doing yarn overs in every 10 rows, through 8 stitches.
- So 35 rows.
- Transition to alternating reverse and straight rows.
- Having knitted 10 r with the addition of yarn overs, the work is re-worked on circular knitting needles.
- The second leg is knitted in a similar way, with its loops re-cast onto circular knitting needles.
- Knit another 35 rows, expanding the fabric with yarn overs.
- Switch to decreases, knitting a row according to the pattern: 1 LP, 2 IP and so on until the end.
- In this row, the elastic band begins, in which the purl loops are connected into one.
- Knit 24 r with an elastic band.
- Close the loops.
- The gusset is pulled apart to reveal a diamond shape, the outer stitches are picked up on the knitting needles and a square is knitted, closing it on the reverse side.
The suit is decorated with appliques of cars, animals, trains, etc.
Dress for girls
Every girl, even if she is only a few months old, should wear a charming summer dress. For knitting you will need cotton yarn and a size 3 hook. Knitting begins with a yoke:
- Cast on 44 loops.
- Mark every 11th stitch to increase before and after.
- To make a square yoke you need to make 4 rows.
- Knit a row according to the hem pattern.
- Set aside the loops on the sleeves, which are knitted in one row according to the hem pattern.
- When knitting sleeves, add 5 air loops to the armholes.
- Continue knitting the hem (15 r).
To finish, tie the neckline with one row of single crochets.
Bodysuit
Comfortable raglan bodysuits are easy to knit. The product is knitted using stockinette stitch and putka stitch. You need to knit a sample, take the baby’s measurements and calculate the required number of loops.
The work begins with performing the raglan:
- Cast on the appropriate number of stitches and knit 6 rows with a tangle to get a clear border definition.
- Separate the loops and knit raglan, adding loops in 4 places.
- In the central part for the front, knit a small section with a tangle 6 loops wide.
- Knit raglan, set aside stitches to make sleeves.
- Connect all the loops of the front and back front with circular knitting needles, and knit 6 rows in the round. stockinette stitch, 6 r. confusion and again 6 rubles. iron.
- Knit the front and back halves of the panties separately, make corner decreases, cutting each row by 2 stitches. Yarn over the buttonholes in the right places.
- Knit the sleeves in a tangled pattern and sew on buttons.
Sleeping bags
A very practical solution is a sleeping bag for a newborn. The baby is not yet accustomed to sleeping with his arms and legs outstretched, so he needs to limit his movements while sleeping. A sleeping bag copes with this task perfectly.
The sleeping bag is easy to make.
- You need to knit a continuous fabric 200x50 cm.
- The first 15-20 rubles. knit according to the English elastic pattern.
- Next comes the main fabric, which is made with stockinette stitch or decorated with arans, braids or honeycombs and other patterns, depending on the skill of the needlewoman.
- On the sides of the fabric, the first and last 10-15 loops are also made with an English elastic band - for the strap. Or it is done at the end, additionally tying the fabric. 4-5 holes are made on it for loops (during the first 80 cm of knitting).
At the end of the work, one half with holes is placed on the other, leaving a little space for the hood, which is made by folding the top edge of the panel in half and crocheting the edge with a row of single crochets. Buttons are sewn under the holes and the sleeping bag is decorated with accessories (optional).
Master class on knitting overalls for a newborn “Classic”
JUMPSUIT FOR A NEWBORN “CLASSIC” WITH A ZIPPER, WITH A HOOD. BASIC MODEL - WITHOUT DECORATION. To size 6-9 months (height 68-74 cm).
This MK provides data for one age, but the knitting technique for other sizes is similar; at the end of the text there is a table of overalls sizes for ages from 0 to 18 months.)
Decorating the product according to your taste and imagination - for example, a combination of several colors of yarn, various handmade knitted appliqués, additional details (ears or pompoms on the hood, pockets, scallops, ruffles, frills, etc.), as well as decorations (bows, ribbons, beads, decals) choose as you wish!
Required:
- Yarn Troitskaya “Zimushka”, 30% alpaca, 70% acrylic, 100 m x 50 g, color “Light Salad”, yarn consumption 210 g.
- Circular knitting needles No. 3
- Stocking needles No. 3 and 2
- Hook No. 2.25
- Zipper in yarn color length. 40-45 cm
- Knitting markers
- Pins for removed open stitches (or additional needles)
- Tips for textile cords – 2 pcs.
- Scissors
- Needle
Knitting patterns
Basic knitting: stockinette stitch - knit. n. in persons R., out. p. in purl. R.
Elastic band 1x1: alternating 1 person. and 1 p.p.
Double hollow elastic band when knitting in the round: Row 1 – knit only knits. p. (behind the front wall), purl. n. remove the thread without knitting before work.
Row 2 – knit only purl, knit. n. remove without knitting, thread at work.
Row 3 – repeat row 1, while knitting. p. behind the front wall
Raglan lines: 2 sts, knitted in purl stitch: in knit stitch. R. purl, in purl. – person.p.
Additions before and after raglans - “shell”. “Shell”: 3 loops from one stitch. Knit: *knit, yarn over, knit. crossed from the same p.. of the previous row*. “Shell” is performed in every 4th row (= every 2nd front row)
The abbreviations used for hook are:
VP – air station.
Connection art. – connecting post
Knitting density: 21 p. and 23 p. = 10 x 10 cm
DESCRIPTION OF WORK
The overalls are knitted from the neck line in two stages: from top to bottom and then the hood - from bottom to top.
Edge loops are included in the number of loops indicated in the description.
Read more about edge loops here
- Calculation of the number of loops to be cast on
To calculate, you need to know two values: the neck circumference in cm and the individual density of your knitting, i.e. the number of loops in 1 cm in width.
Read more about calculating loops for raglan HERE
My measurements for overalls for 6-9 months:
OGorl. – 27 cm, but because this is outerwear, add “freedom” = 32 cm.
Ind. Knitting density 2.1 stitches in 1 cm: 32 cm x 2.1 = 67.2, rounded. 68 p.
The total number of loops cast on is 68.
2. Set of loops
On two pairs of circular needles, cast on 68 stitches using the open stitch edge.
Details about the technique of casting on loops in the video MK
Set aside knitting from one pair of knitting needles. With the second pair of knitting needles, start knitting the overalls from top to bottom.
3. Calculation for raglan
How to knit a baby blanket for a newborn, diagram with explanations
A baby blanket for a baby is multifunctional: in combination with a ribbon or bow, you can wrap your baby in it when leaving the maternity hospital. It can also be placed in a stroller or on any other surface before placing the baby there. You can also cover your baby with a blanket while sleeping. Therefore, before the baby is born, try to purchase a baby blanket. And if you have basic knitting skills, you can make a blanket yourself, for example, from pink yarn measuring 45 x 70 cm.
To make it you will need:
- 6 skeins of wool yarn, of which 50% is camel (58 m/25 g);
- knitting needles No. 4.5.
Patterns: stockinette stitch, pearl pattern.
Performance:
- Cast on 91 sts on your knitting needles and start working with a pearl pattern;
- Having knitted five cm, start knitting according to the pattern: the first and last 10 stitches - with a pearl pattern, the middle 71 stitches - knit. satin stitch;
- Having reached a length of 65 cm, start knitting all stitches again with a pearl pattern;
- After knitting 70 cm from the beginning, bind off all the loops.
The main advantages of knitted overalls
High-quality blouses, hats, booties and pants are very important in every baby’s wardrobe. But when the baby is dressed in a knitted jumpsuit, his mother can be calm. After all, such a thing is comfortable and cozy, and high-quality yarn protects well from the piercing wind. There is no longer any need to be afraid that, due to the baby’s active movements, his pants will slip off or the buttons of his blouse will come undone, because in overalls it is comfortable for both girls and boys to explore this world.
Experienced needlewomen note that any woman can make knitted overalls for a newborn, because in this case there are simply no special requirements. The main task of the craftswoman is to understand the principle of knitting and adjust all recommendations in accordance with the size of the child. In addition, clothing for girls and boys at this age does not have any special distinctions.
You can start knitting the main fabric from both the upper and lower parts. In order to avoid the most common mistakes, it is better to start getting acquainted with such work with a raglan or dropped armhole. Depending on the preferences of the needlewoman herself, pants and sleeves can be short or long
In this case, it is important to take into account the season and purpose of the future overalls
Experts draw attention to the fact that many mothers and grandmothers prefer to knit entire sets for their babies. In this case, overalls are often supplemented with the following elements:
- Hood. This option will definitely add originality and practicality to the main product. Depending on the chosen model, the hood can be equipped with original buttons, embroidery, tassels and even ties. In any handicraft there is room for flights of fancy, because a craftswoman can independently make not only a high-quality, but also a unique item.
- Cap. A knitted headdress can have tassels, pom-poms or ties. The choice of one element or another depends on the age of the child and the mother’s capabilities.
- Booties and socks. In this case, a fantastic scope opens up for the needlewoman to express her imagination. You can truly “revive” a jumpsuit that has been knitted in stockinette stitch with original brightly colored booties.
- Blanket and rug. This set will become indispensable during the cold season. In this case, the baby will feel most comfortable, because in cool and windy weather, knitted overalls for newborns are best kept warm. It’s quite easy to understand the diagrams, especially if the craftswoman has already encountered such work before.
https://youtube.com/watch?v=xv1cItJBNEw
Handicraft Basics
Thanks to existing patterns and patterns, you can master this skill without much effort and skill. First of all, you need to pay attention to the selection of material from which the suit will be knitted for a newborn boy or girl. The yarn should be soft and elastic so as not to irritate the baby's delicate skin. It is better to use expensive and high-quality material with a mixed composition of natural fibers with acrylic or microfiber. A product made from cotton threads will be hard and rough to the touch, and a product made from pure wool can cause itching and redness of the baby’s skin.
It is better for beginning needlewomen to use a simple model with a simple pattern. Having mastered this skill, you will be able to knit a suit for a newborn up to 3 months, using a variety of patterns and various additions in the form of inserts, as well as replenish your wardrobe with more original things - these are dresses, panties, caps, booties and many other items of clothing .
It is much easier to knit costumes for newborns up to 3 months using knitting needles with a description. Guided by detailed diagrams, you can avoid mistakes when calculating the number of loops, connecting product parts and other nuances of the knitting process. The following descriptions of knitted items for children are offered.
Deciding on the size
To start knitting, let's perform a few more important operations. You need to decide what the jumpsuit will be like. It will be knitted together with booties (socks) and a hat. How will it fasten? The answers to all these questions will allow you to decide how many loops to cast on and which part to start with.
Now we determine the size of the overalls
It is important to remember that it should be free and spacious. If the baby has already been born, then you just need to measure him and add a few centimeters for growth
If this miracle has not yet appeared, then we can take into account that most often children are born with a height of 48-53 cm. You can take any romper and blouse as a basis.
The pattern should not be very voluminous and convex, it will put pressure on the child. The simplest patterns, such as garter stitch, will do.
The overalls pattern could be like this:
What you need to buy for work
To knit, you will need yarn, knitting needles or a crochet hook and a knitting needle. You can purchase these things by visiting a handicraft store, which is available in any city.
But before you go shopping, decide on the model that you will implement.
Yarn
When purchasing yarn, base your choice on the following points.
Consider the season for which the knitted baby jumpsuit is intended.
- For the winter model, it is better to choose yarn containing alpaca or merino wool with the addition of high-quality acrylic.
- For the summer option, cotton, viscose and silk are suitable.
- High quality acrylic items are suitable for any season.
Knitting needles and needles
It is preferable to select knitting needles based on the following method. Fold the thread of yarn you have chosen for the future product in half, twist it slightly and compare the diameter of the resulting thickness with the thickness of the knitting needle you are purchasing. If it matches, then the knitting needles are guaranteed to fit.
A knitting needle will be useful for assembling the finished product. Its distinctive feature is a blunt tip that will not destroy the structure of the yarn fiber.
What you need for work
If we knit overalls for a newborn with knitting needles, it is best to watch the master class on a video on specialized websites. To work on children's overalls, the craftswoman will need:
- Crochet or knitting needles.
- Yarn. It should not be synthetic, since synthetics cause sweat quickly, and this can lead to the formation of diaper rash. Also, synthetics can cause allergic reactions and irritate sensitive skin. In addition, the yarn should not be scratchy.
- Knitting pattern. It can be found on the Internet, in women's magazines or in specialized literature devoted to knitting for babies.
- Fastener - zipper, Velcro, buttons or metal rivets. Experts say that the most comfortable overalls for newborns are ones that are fastened with a zipper that runs from top to bottom, from the neck to the legs.
- Multi-colored scraps to decorate the finished product with an applique in the form of an apple, an orange or a funny animal.
You can also sew children's outerwear using a ready-made pattern from thick fabric, but the knitted version is more convenient, since the yarn stretches, and such a suit is easier to put on the baby. However, it should be borne in mind that a child should never wear woolen clothes on his naked body. Before putting on the overalls, you need to put on the baby's vest, blouse and rompers.
General description of the process
To knit a jumpsuit for a child under one year old, you must follow the following sequence of work:
- Carefully study the diagram and understand the symbols present on it.
- Take the baby's measurements. You should not rely on the size indicated in the diagram, since all babies are different. In addition, it is necessary to take into account the fact that children grow very quickly, so it is better if the overalls are knitted a little “for growth”. Still, the child mostly lies down for the first three months of life, and too large pants and sleeves will not cause him significant inconvenience. You can always roll up your sleeves and put socks on your feet to prevent your feet from dangling in long onesies.
- Cast on the required number of loops depending on the measurements taken and knit the first row; then continue working strictly according to the scheme.
- First, the top part is knitted, which is a jacket with sleeves, then the craftswoman gradually moves on to the panties. Pants can be closed like tights or rompers or open. In the first case, the very bottom part is done in classic stockinette stitch. The option with closed legs is convenient for the little ones, with open legs - for older children who already know how to move actively;
- Next, a zipper is sewn in the middle in front. You can also add extra buttons or rivets between the legs so you can change the disposable diaper without removing the suit. The field of this product can be decorated as desired. The colors are chosen depending on gender: girls have some colors, boys have others. On average, knitting will take several hours. The main thing is to understand the scheme, and then the work will progress quickly. Before you start working, you can read materials on the Internet on the topic “knitting or crocheting a jumpsuit for a newborn,” and also watch a master class.
For growth
Knitted overalls for a newborn are very practical, but small children grow very quickly, and the item does not have time to serve them long enough. When knitting a jumpsuit for a baby, you can use some tricks that will allow you to wear it not for a couple of weeks, but for several months.
This is especially practical for children born in winter or autumn. A jumpsuit knitted for growth will last them throughout the cold period.
Tricks for wearing a knitted jumpsuit longer:
- Use the transformer model. This is the most practical option, which will allow you to first use the suit as a cocoon, and then as a full-fledged suit with two legs.
- On the cuffs of the sleeves and legs, you can make a longer elastic band, which will first have to be tucked, and then it will add 3-5 cm in length when the baby grows up.
- If you knit a jumpsuit in the form of pants with straps, then due to this you can also use it for a long time, you will only need to alter the buttons on the fasteners.
- You can achieve a small margin of size due to the knitting pattern. If you use a vertical or horizontal elastic band, then they will make it possible to carry the item longer.
- Initially, it is worth knitting a jumpsuit with a small margin, counting on the fact that the child will grow. You just don’t need to make it too big, otherwise it won’t perform its main function - to keep warm.
Knitted overalls for a newborn are a basic item for a child’s wardrobe. It is practical, comfortable and easy to put on, which is important for a small child. This jumpsuit would also make a great birthday or christening gift and would be especially valuable if made by yourself.
Author of the publication
offline 9 hours