Every child should have toys. They allow you to entertain your baby and develop useful abilities.
The stores offer a wide range of toys for children of different ages, but not all children's items meet safety parameters.
Therefore, if the family wants the child to have high-quality and unique things, then you can think about how to make toys for newborns with your own hands.
Educational toys from scrap materials
When planning to make a play item for a baby with your own hands, it is recommended to choose for implementation ideas for developing options for items for the child’s leisure time. On the Internet you can find many different master classes on creating toys for newborns and infants. Many parents cannot decide what to do for a child under one year old.
When choosing an option, it is recommended to consider:
- parents' abilities. Ability to sew, knit;
- availability of necessary materials;
- safety. The product must be hypoallergenic and non-traumatic;
- baby's age.
Options for educational toys that you can make with your own hands:
- baby sling beads . You need to take large beads of different sizes and crochet some of them with natural yarn. Connect together. Hang it above your baby's crib. They will develop vision. When the baby grows up, he will touch them, developing tactile perception;
- rattles _ They can be made from a small baby food bottle, filling it with beads, buttons, and cereal.
The toy should be bright and multifunctional, attracting the baby. It is important that she develops vision, hearing, attention, and tactile perception.
DIY soft felt toys
Felt is an ideal option for sewing play items for babies.
It is pleasant to the touch and does not cause allergies. He is easy to work with. Here are some soft toys you can make for newborns with your own hands:
- bear;
- bunny;
- Sun;
- ladybug;
- cloud;
- flower;
- butterfly;
- ball;
- fish;
- tree;
- bird, etc.
Patterns
To sew a neat and beautiful felt toy, you need to make a pattern or template. If you have sewing skills, a woman can make it herself. It is also easy to find patterns for sewing felt toys on the Internet. They can be transferred to paper by redrawing or downloaded and printed.
Pattern of the sun and clouds
Step-by-step manufacturing instructions
The creation of any craft includes the following stages: preparing materials and tools, drawing up a template, transferring it to the material, cutting out elements and stitching them according to the pattern. The table below provides step-by-step instructions for sewing felt toys suitable for newborns and infants.
| Name of the toy | Materials and tools | Creation algorithm |
| Volumetric sun |
| Draw a sketch of the sun on paper and cut it out. Place it on light orange felt and trace along the outline. Cut out. Similarly, make the second part from dark orange material. On a light orange blank, embroider the face of the sun (eyes, mouth) with black and red threads. A back stitch should be used. Place the piece with the embroidered face on top of the second, so that the rays of one element are between the rays of the other. Sew both parts in a circle using a “lowercase” seam. When a 3 cm area remains unsewn, then you need to carefully fill the toy with padding poly, giving it volume. Sew up the sun until the end. You can decorate it with beads by sewing them to the rays. |
| Cloud |
| Draw a cloud on paper. Cut out the sketch. Attach it to the felt and trace along the contour. Cut out the part. You will need two of these elements. Embroider the eyes and mouth of a cloud on one piece. Then attach two elements and sew them along the contour, not forgetting to fill them with padding polyester. You can cut out two circles from pink felt and sew them to the front of the cloud as cheeks. Quilt the craft randomly through several places to imitate surface unevenness. |
| Ladybug |
| On white paper, draw a large and medium leaf of a tree, a large and small circle and two ovals. Cut out every detail. Place the tree leaf on the green felt, trace along the outline and cut out. Place a large circle on the red material, trace and cut out the part. Embroider a stripe with black thread in the middle of the circle. Place small circles and two ovals on the black material. Trace the elements and cut them out. All that remains is to connect the parts, forming a ladybug. Sew small black circles to the red circle (all over the piece in a chaotic order) and two ovals (near the end of the black embroidered strip). Attach the finished part to the leaf and sew it on. |
The instructions for creating toys from felt depend on what kind of figure is being made and how complex the work is.
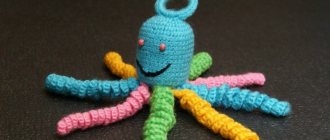
Crochet Scops Owl - master class
A lovely Scops Owl owl - it can be knitted for a child of any age. If you want to make a gift for your baby, put a Kinder Surprise container with beads inside the owl (don’t forget to seal it on the outside with tape), you’ll get a “musical owl.” The height of the toy is 16 cm.
Abbreviations: KA - amigurumi ring, STBN - single crochet, SSN - double crochet, СС2Н - double crochet. with two crochets, SST - connecting column, decreasing. - decrease, increase. - increase, VP - air loop.
For the master class you will need:
- Cotton threads, the owl is made with Yarnart Jeans yarn (55% cotton, 45% polyacrylic 160m/50g) in pink, yellow, blue and white colors.
- The recommended hook size is 2 mm.
- Filling: padding polyester, holofiber, padding polyester.
- The needle is thick.
- Marker.
We recommend reading: Do-it-yourself tulle skirt, master class for an adult, for a girl, girls - how to sew step by step with photos
Head (pink part).
The beginning is the same as for all amigurumi toys:
1st r: VP and 6 STBN in VP. Tighten the KA. 2nd row: 6 increases (12) 3rd: (1 STBN + increase)* 6 (18) 4th: (2 STBN + increase)* 6 (24) 5th: (3 STBN + inc.)* 6 (30) 6th: (4 stbn + inc.)* 6 (36) 7th: (5 stbn + inc.)* 6 (42) 8th: (6 stbn + inc.) )* 6 (48) 9th: (7 SC + increase)* 6 (54)
From the 10th to the 19th rows - 54 STBN (54) in the photo.
Next - decreases. 20th: (7 STBN, decrease)* 6 (48) 21st: (6 STBN, decrease)*6 (42) 22nd: (5 STBN, decrease)*6 (36) 23- th: (4 STBN, decrease.)*6 (30) 24th: (3 STBN, decrease.)*6 (24) 25th: (2 STBN, decrease.)*6 (18) 26th: (1 STBN, decrease) * 6 (12) 27th: 6 decrease. (6)
We fill the head with filler.
Connect all loops with a needle. Sew in the center.
Owl head (blue part).
1st: 6 sc in amigurumi ring 2nd: 6 inc. (12) 3rd: (1 sc + inc.)*6 (18) 4th: (2 sc + inc.)*6 (24) 5th: (3 sc + inc.)*6 (30 ) 6th: (4 sc + inc.)*6 (36) 7th: (5 sc + inc.)*6 (42) 8th: (6 sc + inc.)*6 (48) 9 th: (7 STBN + add.) * 6 (54)
From the 10th to the 19th row continue knitting without changes (54)
From this moment on, we must make a blue “visor” on the cap, which protrudes like a triangle above the beak.
20th row: we continue to knit the “visor” in turning rows. 14 STBN, turn. 21st: 14 SC, turn 22nd: start decreasing on both sides. Decrease 10 STBN, decreasing. (12) 23rd: decrease, 8 STBN, decrease. (10) 24th: decrease, 6 STBN, decrease. (8) 25th: dec., 4 STBN, dec. (6) 26th: kill, 2 STBN, kill. (4) 27th: decrease, decrease. (2) We finished the hat. The hat is decorated with flowers that can be crocheted or knitted at random.
Ears (2 parts).
With blue yarn we cast on 14 VPs and connect them into a ring 1st row: 14 STBN (14) 2nd: decrease, 3 STBN, 2 decrease, 3 STBN, decrease. (10) 3rd: decrease, 1 STBN, 2 decrease, 1 STBN, decrease. (6) 4th: decrease, 1 STBN, decrease, 1 STBN (4) 5th: decrease, decrease. (2)
We make “tassels” on the ears. To do this, cut off 30 cm of blue thread and fold it into 4 folds. Then insert the hook into the upper corner of the eye. Through this resulting hole we pull out a layer of thread. Tighten and cut off excess length.
Beak.
1st row: Yellow yarn 3 SC in KA 2nd: 3 SC (3) 3rd and 4th rows: same as 2nd. Cut the thread.
The body of an owl.
We start with pink yarn.
1st row: 6 STBN in KA 2nd row: 6 increases (12) 3rd: (1 STBN + increase)* 6 (18) 4th: (2 STBN + increase)* 6 ( 24) 5th: (3 sc + inc.)* 6 (30) 6th: (4 sc + inc.)* 6 (36) 7th: (5 sc + inc.)* 6 (42) 8th: (6 STBN + inc.)* 6 (48) 9th: (7 STBN + inc)* 6 (54) From the 10th to 19th rows - 54 STBN (54)
Next - decreases. 20th: (7 STBN, decrease)* 6 (48) 21st: (6 STBN, decrease)*6 (42) 22nd: (5 STBN, decrease)*6 (36) 23- y: (4 STBN, decrease.)*6 (30) 24th: (3 STBN, decrease.)*6 (24) 25th: (2 STBN, decrease.)*6 (18) Stuff the body with filler and you can sew it to your head.
Legs (2 parts)
First detail. 1st row: 4 STBN in KA from 2nd to 5th row: 4 STBN The second part is knitted in the same way as the first, then we attach the first part to the second part and continue tying. both legs in a circle. from 6th to 8th row: 8 STBN (8) 9th row: 4 decrease. (4)
Collar.
You can make a small piece of the collar, or make it in a circle. If you want to make a round collar, cast on 37 VPs with white yarn. 1st row: 36 STBN, VP, turn. 2nd: 2 VP, skip 3 SC, and in the 4th we knit a SC, * 3 VP, skip 3 SC, and in the 4th we knit a SC* - repeat until the end of the row. reversal 3rd: *ССН and here 5 СС2Н* - repeat until the end of the river.
Wings (two parts).
We collect 10 VP.
1st row: skip the 1st VP from the hook, in each. perform the subsequent one according to STBN - (9 STBN). Then 3 VP - moved to the other side of the chain.
In each VP, perform one STBN - 7 STBN in total (that is, without reaching the end of the row).
2nd r: VP, turn. In each STBN of the previous year. perform 1 STBN - (7 STBN). In a chain of 3 VPs we make 2 STBN, 3 VP, 2 STBN. In each column previous R. we knit 1 SC - (7 SC).
3rd row: VP, turn. In each column previous R. perform 1 sc - 9 sc. In a chain of 3 VPs we make 2 STBN, 3 VP, 2 STBN. In each STBN previous R. knit 1 STBN - (7 STBN)
4th row: VP, in each. column before R. 1 STBN each - 7 STBN in total. In a chain of 3 VPs, make 2 STBN, 3 VP, 2 STBN. In each column previous row we knit 1 STBN - (9 STBN). Tighten the knot and cut off the excess threads.
Sew wings and legs to the body. Sew ears with tassels onto the hat. Embroider the eyes and sew on the beak.
On the video - how to crochet an owl toy:
Crochet owl / Part 1/MASTER CLASS Watch this video on YouTube
Crochet owl /Part 2/ MASTER CLASS Watch this video on YouTube
What can you sew for a baby in a crib?
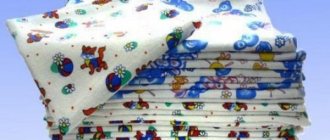
Many parents wonder what toys they can make for a newborn’s crib with their own hands. The best option would be fabric sides.
Toy bumpers made of fabric
These are soft products that are placed around the perimeter of the crib. They serve as protection for the baby, and also contribute to the development of his vision and tactile perception. You can make them from pillows. For example, it’s easy to create toy bumpers in the shape of owls.
Creation algorithm:
- take the required number of pillows so that you can furnish the crib with them;
- sew natural fabric of a single color onto the front part;
- Pinch the upper edges to form owl ears;
- cut out circles from white fabric and sew them on as eyes;
- use black thread to embroider the eyelid with eyelashes (the eyes will be closed);
- Cut out wings from a material of any color and sew them onto the pillow along the edges;
- embroider a bird's beak;
- do the same with the rest of the pillows.
Mobile
A newborn spends almost all of its time sleeping. His vision and hearing are imperfect. The mobile will help develop the child in this direction. It is a structure with hanging small toys. It is placed above the crib.
You can sew figures of different animals from fabric. The main thing is to show your imagination. It is useful to make bags filled with cereals, coins, peas or beans. When touched, they will make a sound, training the baby's hearing and attention.
You can also make crocheted or knitted animal figures. It is recommended to create black and white cardboard cubes. A structure similar to a cross is made from thick wire.
Mobile elements are hung from it by strong threads. The game object should be placed at a distance of 30 cm from the newborn’s eyes.
You can sew a developmental mat and place it in a crib or playpen while the baby is awake.
How to sew a ball for children from 0?
This is how beautiful it will turn out.
This type of ball is called Amish. This name is given by the name of some Christians who formed unusual villages and decided to live here as their ancestors lived. Amish women are excellent sewers and have many quilts in their homes. They sew various toys from leftover fabrics, including balls for children.
As you can see, you will need to cut out three types of elements, from small to large. Cut them from scraps of several colors or two, as in this example. There are 24 petals that will be located inside, they have the same color. And 12 more are outside.
Take two petals, fold 1 and 2 in half and match their folds. Place these two pieces on top of the third one.
Stitch these elements together, but leave a small gap through which you will stuff this dish with soft filling.
Sew 12 of these pieces, stuff them with stuffing and place a small bell inside each pad. Then you need to sew up the holes.
Next, for such a toy for children from 0, you need to start assembling these elements. In this case, the front side of the blanks should be on the outside. First, take three pieces and sew them together.
Now collect these bagels into a ball. Take three such blanks and connect their tops, sewing them together. Now all that remains is to sew on the fourth piece. The technology of this work is shown in the following photo.
That's it, you can give a developmental ball to your baby so that he can play with it to his heart's content.
Leftover fabric and thread can also be used to create very nice toys for babies. The next master class and step-by-step photos will teach you how to do this.
How to make a developmental mat for a baby?
An educational mat is a universal toy that a baby should have. It helps improve vision, tactile perception, and stimulates the baby to explore the world. The easiest way to make a rug is from an old soft blanket.
Fabric appliqués are sewn onto its surface. They may be slightly convex. To add volume to the elements of the rug, you should use padding polyester. If the toy will be used on the floor, then it is recommended to equip it with arches and sides.
Arcs are created from thick wire, wrapped in foam rubber and lined with natural fabric. You can hang various toys on them to develop your baby’s vision and hearing. The sides are made of soft fabric.