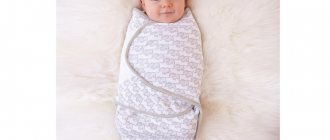
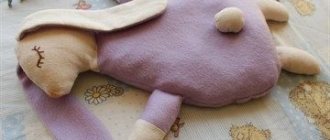
We sew a warm nest for newborns with our own hands
The closed shape of the nest is very comfortable for the baby; he takes the most physiological and correct position.
And the space around creates a feeling of warmth and comfort, similar to that which surrounded the child in the womb. Regardless of the size of the bed, the baby feels more protected and sleeps peacefully
This is extremely important for the child, since excessive anxiety leads to digestive dysfunction, colic and negatively affects the baby’s nervous system.
The nest is indispensable in cases where the child needs to sleep with his parents in bed, and at the same time separate his personal space. Parents are often afraid of disturbing the baby in his sleep, pinning him down or accidentally pushing him out of bed, so such a device will come in handy.
The nest will definitely come in handy when traveling if you need to spend the night in a hotel where there is no cot.
In addition to sleeping, such a nest is convenient to feed the baby and engage in its physical development (gymnastics, massage). This is especially true for night feedings if the mother finds it difficult to feed her baby while sitting. The sides will also provide support when placing the baby on his side, on his tummy, and will help him learn to hold his head up.
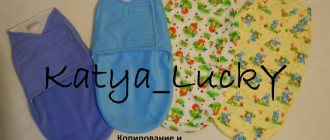
Beautiful ideas for nest colors for a boy and a girl can be seen in the photo:
To make a nest you will need:
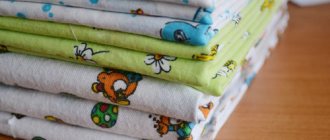
- Two pieces of fabric (plain and patterned), measuring approximately 100 cm. For girls, it is customary to choose pink and lilac tones, for boys - blue and light blue. And shades of yellow, green, white and beige will be universal.
- Sintepon as a filler.
- Lace – 3 m.
- Bias binding – 2.6 m.
Description of the work progress.
We begin our master class by drawing a pattern according to the dimensions indicated in the photograph:
Using the pattern, we cut out 2 parts from different fabrics. Then they need to be basted, folded inside out and stitched, leaving the bottom part open (starting from the middle of the tongues).
Turning the work right side out, we sew bias tape along the seams on both sides.
We cut out a three-layer piece of padding polyester 30x60 cm for filling and round the corners.
Fill the mattress and stitch around it (approximately 15 cm from the edges).
Using a 200x60 cm padding polyester tube, we stuff the sides of the mattress. You can also use trimmings.
You need to insert a lace into the resulting “path” between the seam and the bias tape (using a pin). We machine sew the open edges and close the seams using bias tape.
By tightening the lace, we give the mattress the desired shape. The lace can be replaced with a beautiful ribbon.
The baby's nest is ready!
A large pattern of a nest for a baby looks like this:
These nest sizes are suitable for a child up to 6-7 months
When choosing a fabric, it is very important to pay attention to the fact that it is natural (preferably 100% cotton), soft and pleasant to the touch. You can use any cotton fabric, including calico, flannel
For decoration you can use ribbons and small embroidery.
How to sew a cocoon with Velcro:
This pattern will help you sew a cocoon nest with Velcro legs, which will also be very comfortable for a newborn and a child in the first months of life.
The dimensions of the cocoon are 85x60 cm. The legs do not need to be cut out separately, but the work can be done in the form of an envelope. To securely fix the cocoon on your head, you will need a cord for the hood.
For sewing, fleece, flannel, and fleece knitwear are used. In the cold season, it is recommended to make a double cocoon, consisting of a lining and main fabric. Such cocoons are very convenient for sleeping and attending doctor’s appointments, but you should not overuse them, since the baby needs to move actively and freely.
Cocoons for newborns can be knitted or crocheted. To do this, you need to choose soft hypoallergenic yarn. The measurements you need to use are the girth of the torso under the armpits and the length from the armpits to the heels. You can choose the pattern to your liking; patterns that are too large and complex can create uneven pressure on the baby’s skin and cause discomfort, so it’s worth choosing simpler ones (elastic band, rice pattern, etc.).
Measurements and calculations
Most models are available in two sizes: S and M. The first is mainly used in medical institutions for premature babies, that is, for those for whom it was originally designed. This size is designed for newborns up to 2–2.5 kg. The second is suitable for babies born at normal weight (up to 2.8–3 kg). This is the pattern you should choose when making a cocoon for home use. Less often you can find size L, suitable for large babies.
It is important to choose the right size pattern so that the baby’s cocoon nest is comfortable and cozy from the first days, and it does not feel cramped for a long time
To determine the optimal size of the product, it is necessary to take into account the child’s weight and height. The standard size of the item is 30 x 65–67 cm (sleeper)
It is good for babies up to 6 months. If you plan to use a cocoon at 6–12 months of a baby’s life, you need to create a product with a sleeping area of 40 x 80 cm, for larger babies - 45 x 95 cm.
When making a cocoon, you should correctly calculate the required amount of fabric and filler. For premature and small babies, an option measuring 50 cm in length and 25–30 cm in width is suitable. For toddlers from 3 to 6 kg, you will need a pattern 65–70 cm long, 30–35 cm wide. The fabric should be taken based on these dimensions, adding a margin of 10–15%. Also, do not forget that there are several parts, so it is better to take a little more material depending on the chosen model.
The length of the bed should correspond to the height of the baby
Cozy nests
When born, the baby experiences discomfort, because the mother’s belly was warm and safe. He felt that he was protected from all sides. In life, a mother cannot be nearby every minute; a nest for newborns will provide a feeling of comfort during sleep.
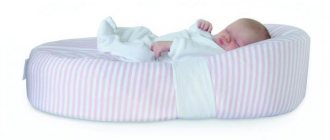
It is an anatomically shaped mattress. It follows the curves of the baby's body and has sides on all sides, so that the baby cannot fall out. Such mattresses were first invented by French doctors, but studies have shown that their use will also be beneficial for full-term babies.
What are the advantages of such a device:
- The child feels comfortable and calm;
- Children's sleep becomes stronger;
- The anatomical shape contributes to the correct formation of the spine;
- Reduces muscle hypertonicity;
- There is no risk of sudden respiratory arrest due to suffocation (SIDS);
- Reduces the incidence of colic;
- The risk of developing cranial pathologies is reduced.
The cocoon reminds the baby of being in the arms of his mother or in her womb. It makes it convenient to feed your baby. As for the disadvantages, they include:
- Cost – such products are more expensive than regular mattresses. The average price is 10 thousand rubles.
- Short lifespan – the nest lasts for about 2-3 months, until the baby starts to roll over.
- Some mothers note that the baby may feel hot in the cocoon.
An envelope or diaper - a cocoon for newborns - can partially take on all of the listed functions.
Types of nests
The baby accessories market offers practical orthopedic cribs and various accessories. Many mothers are lost in the choice, because they want their child to be comfortable and warm in such an item.
From the first days of a newborn's life, it is important to provide him with comfort and security.
Baby cocoon
Reminiscent of a small ergonomic crib. It has a wide range of uses: as a chaise lounge, placed in a bed. Due to the softness of the material used, they take the shape of a newborn’s body. Therefore, by placing a child in such a cocoon, the load on his spine is removed. Due to rounding, the baby takes a position identical to that in the womb.
Cocoon mattresses are made in three sizes, tailored to the weight of the newborn.
Advantages:
- special design reduces the likelihood of colic;
- reducing the risk of muscle tone;
- saturation of the lungs with oxygen;
- the elevation of the upper part prevents the appearance of asymmetry of the child’s skull;
- the baby is secured with a belt, reliably protecting him from falling;
- promotes the development of visual coordination and improves motor skills.
In addition, such cocoons are easy to use and carry. The dimensions allow the device to be used as a sleeping place.
Most often, the device is used for up to 4 months.
Newborn nest
A universal product suitable for strollers, home use, and for walking. It features the ability to unfold up to one hundred and eighty degrees. It can completely replace and complement a nursing pillow, providing the opportunity to attach the baby to the breast.
The size of the cocoon must fully correspond to the height of the child.
Experts also recommend nests for premature babies. They are more difficult to adapt to the environment. It is important to provide the most comfortable conditions, similar to those in the womb. During sleep, the physiological position of the embryo prevents the formation of defective muscle development.
Many manufacturers offer models whose size can be adjusted.
The size of the nests can be adjusted using lacing, based on the structure of the baby. By tightening the structure, you get a cozy place. When the cord is loosened, it makes a wonderful rug with sides. By making a nest for newborns with your own hands, you can get two color schemes.
Using a cocoon mattress is, first of all, the safety of the baby.
Pillow for feeding
This tool makes it easier to care for a defenseless creature. Designed to feed one child or two. Some women use this thing during the prenatal period. The pillow is ideal for baby's sleep and play.
A nursing pillow is an accessory that greatly facilitates the process of caring for a newborn baby.
First of all, such an object relieves the muscles of the mother’s arms and back during the feeding process, since during the process the baby is constantly in her arms. The soft, warm surface provides comfort for the child to eat, securely fixing him in a comfortable position.
Manufacturers offer a variety of product forms.
A woman’s health is also paramount; these devices prevent curvature of the spine under daily stress. The pillow helps to properly attach the baby to the breast. It is difficult for many to do this while pregnant, especially for young, inexperienced women in labor. In this case, the product really saves.
Purchasing a pillow for feeding children in the first year of life will be an excellent assistant for a mother in the process of caring for her baby.
The big advantage is that the mother’s hands are free when feeding the baby. She can sit comfortably while drinking tea or reading. This will allow her to recover faster after childbirth.
There are models of different shapes and sizes. By taking this accessory with you on a trip, you won’t have to worry that your baby will go hungry. The feeding process will be possible in any conditions.
A baby feeding pillow is like a soft “cradle” in which the baby will lie comfortably.
Review of popular models
Cocoonababy Red Castle
This is the quality of the French brand where it all began. The set consists of a pear-shaped base (polyurethane foam material, cotton pillowcase), a leg bolster (attached under the knees, adjustable for height), and a safety belt. The ergonomic dense base will not lose its shape. The position of the baby is such that the head and torso are located at the same level, and the slightly bent legs are higher. The weight of the mattress does not exceed a kilogram. The cocoon is universal in function (sleep, travel, wakefulness, visiting the doctor). Place him in a stroller for walks or in a crib, but don't leave him unattended! The only drawback will be the price - about 11 thousand rubles. Additional items included:
- Blanket CocoonaCover. A convenient device that fits onto the mattress and is fastened with Velcro at the bottom. The child will be comfortable, it warms well and does not slip. Made from 100% cotton.
- Spare pillowcase. It is necessary for frequent regurgitation, surprise when changing a diaper or feeding. It is easy to wash and does not require special care.
Cocoon "Yawn"
Our production “Cloud Factory”. When compared with, there will be the following differences:
- The price is almost 2 times lower (5-6 thousand rubles).
- Weight – “Yawn” is one kilogram heavier.
- Included: Our manufacturer has an additional pillowcase, which the French manufacturer does not have.
They are similar in appearance, almost identical in size. Our manufacturer has provided additional accessories: a “milk + stars” blanket, a “Lamb” rocking chair, a lightweight Simple cover, and a thick Heat cover.
Farla baby shell
Also a domestic product. The peculiarity of this model is the use of low elasticity polyurethane foam. This material is also included in orthopedic mattresses. There are cavities at its base for ventilation (the child sweats less and overheats in the heat). No glue is used when assembling the base (environmentally friendly Farla production). Additional accessories include: blanket, pillowcase, carrier.
Babynest for newborns
Swedish development since 2003. Many models are made in our country. There are large cocoons for twins. This is not an ergonomic mattress, but a soft flat nest with sides that can be tightened with a string. Like the classic cocoon, it is no less popular and wins in price (2 times lower). The base is made of cold foam, the cover is made of cotton, and the sides are made of holofiber.
Nest cocoon for newborn Sleepyhead
The company that came up with this product, Enfant Terrible Design, operates in Sweden. It was founded by Lisa Furuland, who came up with a multi-functional item for her young son. A special feature is the longest service life (up to 8 months, there are models up to 3 years). The non-ergonomic base and sides are made of antibacterial polyester fibers, and the removable cover is made of cotton.
- Sleepyhead Deluxe – cocoon from birth to 8 months
- Sleepyhead Grand – for older babies (8 months – 3 years)
The downside is the price. It reaches 11 thousand rubles. Using a cocoon for a long time is not always useful (and sometimes even harmful). Not all manufacturers are available on our market. It’s good that domestic products are not inferior to foreign ones in quality. World famous companies:
- Red Castle – France
- Woombie – USA
- Babynest and Sleepyhead – Sweden
Cocoon mattress from the manufacturer Woombie
The second most popular manufacturer is the American company Woombie. Their cocoon mattresses have similar properties. The price of these products is also quite high. Considering that the cocoon will be used for only four months, the cost turns out to be a strong argument in favor of finding a simplified analogue.
Cocoon - Mario's Cradle
The Askona company has developed a cocoon - the Mario cradle, the material is very high-quality hypoallergenic highly elastic foam, the nest was developed together with Russian neonatologists for a child from one to six months. The set includes two cushions for placing under the legs of a child for different ages and a removable cotton cover with a lock. Securing the child using a belt with silent Velcro. The price is 4,448 rubles, but the cost of the cocoon is often included in promotions.
Pros of using cocoons
- The nest creates a limited, cozy zone in which the newborn feels safe;
- When sleeping together in the parent's bed, the cocoon protects the baby from accidental crushing by sleeping parents;
- The baby is rocked to sleep by gentle rocking over the sides, then transferred to the crib along with the nest, without disturbing the baby’s sleep;
- The cocoon is convenient for traveling and visiting - in an unfamiliar place the child will have his own familiar corner.
A ready-made nest cocoon for newborns does not always meet the requirements of parents, so some mothers make it themselves. Before starting work, the needlewoman chooses which type of cocoon suits her best:
- diaper (a model in the form of a bag with Velcro or a zipper, allowing you to quickly swaddle and not tightly fix the arms and legs of a newborn);
- mattress (a factory-made orthopedic product with an anatomical depression to accommodate a baby);
- nest (a kind of cradle with a comfortable base and wide soft sides, actively used from the moment the baby is born until 5-6 months);
- pillow (lightweight model, easy to carry and put in a crib);
- transformable blanket (at the request of the parents, it turns into an envelope, overalls, sleeping bag or carrier with a handle).
The most popular model is the baby nest. It is easy to use and make.
Materials and tools for work
Any instruction for sewing a cocoon begins with a list of materials and tools necessary for the work.
Materials you will need:
- 2 pieces of fabric measuring 80×100 or 80×110 cm;
- about 3 meters of cord (can be replaced with satin ribbon or bias tape);
- about 1 meter of bias binding to match the main fabric;
- lace (optional);
- foam rubber measuring 70×40 and a thickness of 2 cm (can be replaced with rolled padding polyester with similar parameters);
- threads
If you have a sewing machine at home, you can try sewing a nest with your own hands
Tools you will need:
- paper (for transferring the pattern);
- tape measure;
- pattern;
- pen, chalk or pencil;
- scissors;
- awl;
- safety pin;
- tailor's pin;
- basting needle;
- sewing machine;
- iron.
But the most important thing, without which you should not even start work, is a template or diagram according to which the pattern will be made and, in fact, the product will be sewn. If you have certain knowledge and experience, you can make a pattern yourself or find it on one of the many sites on the Internet.
Advantages and disadvantages of self-tailoring
You can stand for a long time in front of a display case with cocoons for newborns, but you will regret the money and leave with nothing. But this does not mean that you should abandon such a product completely. Moreover, sewing a cocoon envelope yourself will not present any particular difficulties. Sewing a nest yourself has undoubted advantages:
- the ability to independently choose the fabric with its characteristics, colors, patterns and models;
- saving money - a homemade option, even taking into account the purchase of materials and tools, will be cheaper;
- the ability to correct any nuances during the sewing process.
There are also some minor drawbacks. First of all, we are talking about time costs. This process, although relatively simple, is labor intensive. Sewing or knitting alone will take a couple of days at best. But you still need to go shopping in search of materials. We should not forget that many simply do not know how to sew or knit, and when they decide to independently make new clothes for a baby, they risk wasting time, money and effort.
Cocoon is a great alternative to swaddling
In general, a cocoon for a baby is an excellent invention, which many parents have already appreciated. Considering that the answer to the question of how to sew a cocoon nest for a newborn with your own hands is not difficult to find, it is possible to test the convenience of this invention from your own experience.
Pillow for the legs or chest of a newborn
The second pad is universal. While the baby is lying on his back, you can place it under the baby’s legs, this will make the baby’s gas flow easier. But when you lay him on his tummy or teach him to crawl, this bagel pillow is placed under the baby’s chest so that he does not fall on his side and tries to hold his head. Babies from 4 months leaning on such a pillow will try to pull their legs under them and push off, thereby preparing to crawl in the future.
rogalik.jpg
111.1 KiB
411 Downloads
Pillow for newborns under the baby's legs or elbows. Helps the baby maintain its shape, stretch out on its arms or raise its legs.
- We sew together two parts of the bagel, leaving a hole for turning it inside out.
- Turn it inside out and stuff the pillow.
- Sew up the hole in the bagel.
- It turns out that in today's master class we touched on three very useful devices for babies. Sew it and you won’t regret it.
Design features of the product
The nest cocoon has a number of beneficial properties for the baby’s health. It has low sides and an oblong shape, thanks to which the baby feels protected from all sides. The position of the baby in this convenient accessory is very similar to the one in which he is in his mother’s tummy. The cocoon creates an enclosed space, calming the baby, and allows the child to better and faster adapt to the world around him. Previously, the item was used for children born prematurely, but due to its beneficial qualities, it began to be used for all children.
The benefit of a cocoon is justified if its design exactly copies the anatomical parameters of a toddler. For this, it is very important to make exclusively individual patterns. The cocoon-nest must be sewn in such a way as to provide elasticity to the side rails and mattress; they should retain their shape well. This is necessary for the convenience and safety of the baby. Also, when cutting fabrics, it is important to make the correct calculation, because the accessory must correspond to the individual parameters of the child.
Oblong shape
Elastic sides
Comfortable mattress and pillow
Transformable envelope for newborn
There are other versions of this product, for example, this one.
Cut out rectangles of the same size from two canvases, rounding each one on one side. Choose your favorite applique and sew it onto the front side of the top rectangle. Place one cloth on the face, place sheet filler on top of it, cover with a second identical cloth, which must be placed wrong side up. Sew along the edge of this multi-layered “sandwich”, leaving the bottom small side unsewn. Turn the mattress into a cocoon through it, sew up these edges on your hands or, turning the edge inward, using a machine. Fold the bottom of this blanket up, sew a zipper on the right and left sides
When you place your child on this mattress, all you need to do is lift the bottom of the cocoon up and carefully fasten the zipper. In reverse order, you will unfasten the blanket to get the baby out.
Some parents want their children to be fashionable from an early age. To do this, you need to sew the envelope using the same principle - pull the upper corners towards each other, secure this part with two buttons and loops. The dark fabric is designed as a suit, the light background will serve as a shirt. All that remains is to make a butterfly-bow and a handkerchief from red material, and sew these accessories in place.
The seam at the top should be double, one line should be at such a distance from the second that the elastic would fit freely into the resulting space. Its ends need to be secured by sewing here. At the same time, pull the elastic a little to gather the fabric at the top of the envelope, turning the corner into a comfortable hood.
- braid;
- honeycomb;
- garter stitch;
- elastic band 2x2.
Step-by-step instruction
- Start knitting from the bottom, that is, from the part that will end up at the level of the baby’s armpits. Here you need to make a 2x2 rib pattern, that is, knit 2 knits, 2 purl.
- Next, a “pigtail” pattern is knitted, and between these two elements there is a “honeycomb” or other three-dimensional one. On the left, make a cross elastic, performing two rows with purl stitches and two rows with knit stitches.
- To make holes for the loops, cast off 2-3 loops, in the next row make the same number of yarn overs here, and in the third row knit these yarn overs according to the pattern.
- When you reach the top of the baby's back, perform the rib pattern, not only on the left, but also on the right. Here you need to knit, alternating, 2 rows with knits, two rows with purls.
- Once you have closed the loops, fold the top edges together and sew them together to create a hood. If you have not knitted an elastic band here, then pick up a loop along the edge and knit it at this stage.
- Sew buttons on the left side of the envelope, fasten them, threading them through the pre-formed loops.
Use garter stitch so you don't have to create ribbing at the bottom and sleeves. This pattern is perfect for beginners.
Having knitted the sleeves of the required width, close the loops on the right and left, then continue to knit only the back. Now all you have to do is tie the loops of the “tongue” onto the front neckline, here you will sew buttons to fasten the sweater on the child after he has been dressed. Sew the sleeves at the seams, this is what a wonderful knitted product you will get for your baby.
You can knit the two halves of the shelf separately, without making a “tongue” for the fastener. You will create it using loops knitted on the front placket and buttons sewn on the other side.
How to crochet a diaper nest
The process of crocheting a cocoon is almost no different from the method with knitting needles. Everything is done in exactly the same way: take measurements, select yarn, hook number and pattern. You can knit similar patterns: garter stitch, ribbed stitch - or you can choose a more airy version, which is typical for crocheted products.
Crochet will differ from the version with knitting needles in only one way. It is better to start work from the bottom. The bottom should also be knitted according to the cap pattern. Only the bottom of the cocoon will correspond to the top of the headdress. The remaining part of the nest is knitted in continuous fabric without adding loops.
So, this article showed how to knit or sew a nest for a newborn, which will not only save the family budget, but will also make the baby stand out from other babies.
We sew a warm nest for newborns with our own hands
The closed shape of the nest is very comfortable for the baby; he takes the most physiological and correct position. And the space around creates a feeling of warmth and comfort, similar to that which surrounded the child in the womb.
Regardless of the size of the bed, the baby feels more protected and sleeps peacefully
This is extremely important for the child, since excessive anxiety leads to digestive dysfunction, colic and negatively affects the baby’s nervous system.
The nest is indispensable in cases where the child needs to sleep with his parents in bed, and at the same time separate his personal space. Parents are often afraid of disturbing the baby in his sleep, pinning him down or accidentally pushing him out of bed, so such a device will come in handy.
The nest will definitely come in handy when traveling if you need to spend the night in a hotel where there is no cot.
In addition to sleeping, such a nest is convenient to feed the baby and engage in its physical development (gymnastics, massage). This is especially true for night feedings if the mother finds it difficult to feed her baby while sitting. The sides will also provide support when placing the baby on his side, on his tummy, and will help him learn to hold his head up.
Beautiful ideas for nest colors for a boy and a girl can be seen in the photo:
To make a nest you will need:
- Two pieces of fabric (plain and patterned), measuring approximately 100 cm. For girls, it is customary to choose pink and lilac tones, for boys - blue and light blue. And shades of yellow, green, white and beige will be universal.
- Sintepon as a filler.
- Lace – 3 m.
- Bias binding – 2.6 m.
Description of the work progress.
We begin our master class by drawing a pattern according to the dimensions indicated in the photograph:
Using the pattern, we cut out 2 parts from different fabrics. Then they need to be basted, folded inside out and stitched, leaving the bottom part open (starting from the middle of the tongues).
Turning the work right side out, we sew bias tape along the seams on both sides.
We cut out a three-layer piece of padding polyester 30x60 cm for filling and round the corners.
Fill the mattress and stitch around it (approximately 15 cm from the edges).
Using a 200x60 cm padding polyester tube, we stuff the sides of the mattress. You can also use trimmings.
You need to insert a lace into the resulting “path” between the seam and the bias tape (using a pin). We machine sew the open edges and close the seams using bias tape.
By tightening the lace, we give the mattress the desired shape. The lace can be replaced with a beautiful ribbon.
The baby's nest is ready!
A large pattern of a nest for a baby looks like this:
These nest sizes are suitable for a child up to 6-7 months
When choosing a fabric, it is very important to pay attention to the fact that it is natural (preferably 100% cotton), soft and pleasant to the touch. You can use any cotton fabric, including calico, flannel
For decoration you can use ribbons and small embroidery.
How to sew a cocoon with Velcro:
This pattern will help you sew a cocoon nest with Velcro legs, which will also be very comfortable for a newborn and a child in the first months of life.
The dimensions of the cocoon are 85x60 cm. The legs do not need to be cut out separately, but the work can be done in the form of an envelope. To securely fix the cocoon on your head, you will need a cord for the hood.
For sewing, fleece, flannel, and fleece knitwear are used. In the cold season, it is recommended to make a double cocoon, consisting of a lining and main fabric. Such cocoons are very convenient for sleeping and attending doctor’s appointments, but you should not overuse them, since the baby needs to move actively and freely.
Cocoons for newborns can be knitted or crocheted. To do this, you need to choose soft hypoallergenic yarn. The measurements you need to use are the girth of the torso under the armpits and the length from the armpits to the heels. You can choose the pattern to your liking; patterns that are too large and complex can create uneven pressure on the baby’s skin and cause discomfort, so it’s worth choosing simpler ones (elastic band, rice pattern, etc.).
Sewing materials
A nest is a relatively inexpensive craft, to create which you need to prepare a piece of fabric for the base cover, filler, cord, fastener, braid or bias tape for the drawstring.
The cocoon pattern for a newborn is presented below. You can print it out or draw it yourself according to the sample we offer. You don’t need a lot of fabric for this product. It is enough to prepare a piece one meter long with a width of 1.5 meters. Usually the cocoon is sewn from calico or satin - these are natural cotton materials that are safe for the baby’s delicate skin and quite durable. The product will turn out more beautiful if you use fabric with different colors for the top and bottom of the nest.
It is best to fill the cocoon with padding polyester or siliconized fiber. You can use both - make the bottom from sheet padding polyester, and fill the sides with bulk silicone or holofiber.
Pattern of a cocoon-nest for a baby
Before you sew a cocoon-nest for newborns with your own hands, you need to prepare a pattern. For our master class we will use the “Standard” stencil. All sizes are shown in the diagram; they can be changed based on the individual characteristics of the child.
Pattern of a cocoon-nest for newborns PHOTO: sasha-mamasha.blogspot.com
Making a nest for newborns with your own hands
Let's look at the stages of cutting fabric and sewing a nest for a child in more detail.
| Illustration | Description of action |
| Fold two types of different fabrics in half lengthwise, face inward, and pin each fabric separately with needles. | |
| Attach the cocoon-nest pattern with the long side to the fold, circle it with a marker, connect the cuts together with pins and cut out all 4 layers at once. Mark the top points of the sides with a marker | |
| Break off the pins, unfold the fabric, fold the cuts together, pin along the perimeter and stitch from mark to mark along the outside | |
| Make several notches at the bends and press the seams | |
| Turn the workpiece right side out and sew bias tape on both sides, the seam should be exactly in the middle | |
| Spread the cocoon very evenly, pin it together with pins, attach the pattern of the sides and trace the inside on both sides | |
| Sew the middle of the nest, going slightly over the sides | |
| Pin a pin to a satin ribbon 2-3 cm wide and insert it into the bias tape. Cut the ends of the ribbon into a corner and lightly burn it with a match. | |
| Fill the sides tightly on both sides with holofiber. In the lower part, push aside the filling, fasten the unstitched areas with pins, stepping back inward from the seam allowance of 1 cm | |
| Transfer the pattern onto foam rubber 2 cm thick, step back 1 cm inward from each edge and cut out the mattress | |
| Insert foam rubber inside the cocoon, move it away from the seam allowance line and pin it together with pins | |
| Sew a straight line on a machine according to the markings from our marks; you cannot break off the pins | |
| Iron the bias tape, but not in half; one edge should be 1 mm shorter than the other. Pin the bias tape to the cut edge with pins, baste and sew along the short side using a machine. | |
| Break off the pins, straighten the filling and tie the cocoon with satin ribbons |
Master class: cocoon envelope for the cool season
Tools:
- fabric - raincoat fabric, thick cotton or any other material for the outer layer;
- padding polyester 200;
- flannel or thick fleece for the layer that will be inside;
- zipper - 2 pieces, 0.6 m each;
- Velcro, it can be replaced with two buttons.
Pattern:
Process:
- buy fabric 50 cm long and 150 cm wide;
- cut out parts from raincoat fabric and flannel;
- lay out the parts with insulation in the middle;
- sew along the edge the fabric for the outer layer with the fabric of the inner layer for ease of sewing in the zipper;
- sew zippers between the raincoat fabric and the flannel;
- Sew everything on the sides with the edges folded;
- sew a hood. To do this, fold the edge of the upper part into a triangle, taking turns with different layers of fabric;
- Sew Velcro in the right place for convenience.
For sleeping without a pattern
For those mothers who want to make a cocoon for their baby, but are not yet confident in their sewing abilities, there is a simpler option that does not use a pattern.
- The fabric is folded in half. Measure the baby's height and add 15 cm to it (so that the cocoon can last longer). The resulting number is multiplied by 1.5.
- If an expectant mother undertakes to sew a cocoon, she does not yet know the height of her unborn baby. You can use the average height of newborns - 53 cm.
- As an indicator of width, it is convenient to use the one that coincides with the stroller in order to use the cocoon with it. The usual width of strollers is 32-34 cm. This number is divided in half and measured from the middle of the fold of the fabric.
- Make a pattern of oval parts. If desired, you can make 1 more layer of holofiber using the same parameters.
- All layers are pinned and stitched. You can leave one side unstitched to insert Velcro or a zipper there.