In the first months after birth, a baby makes an average of about 18 bowel movements per day. Your baby's sensitive skin requires special care during this period. Previously, diapers were used for these purposes, which not only warmed the child, but also absorbed excess moisture and baby feces. However, diapers must be constantly changed, washed and ironed, which takes a lot of time and effort. The advent of reusable diapers has made caring for a newborn much easier, but their cost leads to large expenses that not all parents can afford.
Homemade diapers will help solve the problem of maintaining the family budget when a child is born. One of the most suitable materials for their manufacture is gauze.
Types of homemade diapers
There are two general types of diapers available for DIY:
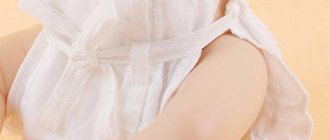
- Disposable products. They are folded in the shape of a triangle or square from soft fabrics, and then such a diaper is wrapped in a certain way on the child’s body. Disposable diapers are the simplest and most affordable to create with your own hands, but they must be constantly changed, washed and ironed.
Gauze diapers are very simple
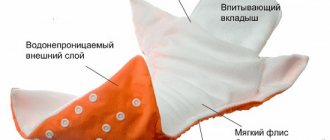
- Reusable products. They are a diaper sewn from natural fabrics with a special pocket made of oilcloth and a replaceable moisture-absorbing insert. Such a product can withstand several cycles of child bowel movements without the need for immediate replacement. Making a reusable baby diaper will require more time and materials, but such products are more practical and easy to use.
Diaper with removable insert
Special requirements are imposed on the material characteristics of homemade products intended to maintain hygiene and preserve the health of a child’s skin:
- absence of components that can cause allergies and various dermatitis;
- the fabric should be durable, but soft enough so as not to rub the baby’s delicate skin;
- the diaper material should absorb moisture well, promote its removal and evaporation;
- The breathability of the material should allow the child’s skin to breathe.
Gauze diapers fully meet these requirements and have a number of advantages.
Preparing the canvas
To make gauze diapers with your own hands, you need to purchase a piece of gauze from the pharmacy. But since the quality of modern gauze is very different from Soviet gauze, it would be better to buy thin cotton fabric at a fabric store or use clean old sheets to make it.
The prepared canvas needs to be cut into rectangles, the sizes of which will depend on the age of the baby and the chosen folding method:
- For newborns, pieces of fabric 60 x 60 are suitable.
- Babies from 3 months will need larger canvases - 90 x 90.
There are practically 3 techniques for folding diapers, each of which has a certain convenience. You can make several pieces of gauze in different sizes for each technique so you can try each one to see which one works best for your baby.
- The “Hungarian” way of putting on a reusable diaper does not require too much fabric. You need to make the pieces by cutting the fabric into 60 x 60 and 90 x 90 squares;
- The “scarf” will fit better and stay on the baby if the sides have a ratio of 1:2 (60 x 120, 80 x 160, 90 x 180);
- The “rectangle” technique involves the use of 60 x 100 canvases.
According to the experience of mothers who used gauze diapers, in order to provide the baby with a supply of reusable products so that they can do washing and ironing only once a day, it is necessary to make 20-25 folding bases. The edges of the fabric should be serged so that they do not lose threads during use or washing.
Advantages and disadvantages of gauze diapers
Gauze is a very cheap and accessible material
The following advantages can be cited in favor of choosing gauze as a material for homemade diapers:
- Economical. One standard package of gauze is enough for 20 homemade diapers.
- Environmental safety, absence of harmful substances and allergens in its composition.
- Easy fabric processing, allowing you to create diapers of the required shape and size
- Softness of the fabric.
- Air permeability, which helps to ventilate the skin and prevents diaper rash.
- All feces are quickly absorbed into the fabric, keeping the baby's body clean.
- Gauze diapers, unlike standard diapers, are not addictive and allow you to quickly potty train your child.
The advantages of baby gauze diapers are obvious, but you must also remember their disadvantages:
- due to the baby’s frequent bowel movements in the first months after birth, disposable gauze diapers must be constantly changed;
- untimely change of a wet gauze diaper leads to various rashes and skin irritations;
- A reusable gauze diaper does not last long; when walking with your child or, for example, going to the pediatrician, you should stock up on spare items.
If you need to travel with your baby, you can use standard reusable diapers. This will cost much less than the constant use of such products.
Folding techniques
There are three methods on how to roll gauze diapers. They can be made using the Hungarian method, a scarf and a rectangle.
Hungarian method
It consists of turning waterproof rags into panties. The method involves folding the gauze or fabric in half, folding the corner again from left to right to the top corner to make a triangle, and flipping the piece back over to make a triangle.
Hungarian method
According to the scarf technique, you need to fold the cut into a triangle, spread it out and lay the baby on top. Next, you need to lift the bottom corner up and connect the side corners so that they do not come undone.
Rectangle
There are two ways to roll using the rectangle technique. In the first case, you need to make two strips of fabric, put them on top of each other, and then place the child on them so that half of the homemade panties protrudes. Then you just need to bring the bottom part up to your waist and tie it with a ribbon. According to the second method, you need to make a belt for such panties by placing ribbons inside the product.
Rectangular method
Sewing reusable gauze diapers
To create reusable gauze diapers, you will need special patterns, since such products require additional elements - a pocket and an insert.
The pocket should be made of waterproof material. To do this, you can use oilcloth or waterproof material. Inserts, on the contrary, should absorb liquids well. For this purpose, you can use fleece, bamboo or gauze fabric. To prevent the material from coming apart later due to exposure to moisture, it must be folded in several layers and stitched along the edges. In this case, you should constantly check and periodically change wet liners. On average, about 12 such sets may be needed per day. You can reduce their number by using a piece of terry towel sewn inside a gauze insert.
To create patterns, use thick paper or fabric; the blanks must correspond to the size of the baby. The inserts can be sewn on or secured using attached snaps. The diaper will stick to the baby more tightly if you sew buttons or Velcro on the sides of the product for fastening.
How to make a diaper with your own hands?
First you need to choose the type of diaper. That is, reusable or disposable .
A disposable diaper is changed immediately after a single use for its intended purpose, and a reusable one is the basis for replaceable inserts. It is clear that both inserts and disposable diapers are washed after use. The main question is how to do it.
You can, following the traditions of your ancestors, choose a traditional gauze diaper , which is folded diagonally from a square piece of fabric. Or choose an option such as a knitted triangle with an elongated top. Unfortunately, this option is not practical, because we are talking about a newborn baby. And he lies in his crib most of the time.
We make waterproof liners ourselves
An insert in a disposable or reusable diaper is needed to increase the volume of absorbed liquid. It is made from the same fabric as homemade children's panties: flannel, gauze, chintz, bamboo material, madapolam. Lining with cotton wool is not suitable for these purposes. When it gets wet, it crumples and the liner will have to be thrown away.
It’s easy to make an insert with your own hands, follow the diagram:
- We take a scrap of the selected fabric, preferably flannel or bamboo, measuring 30x40 cm. We fold it 3-4 times, we get a rectangle.
- Sew the edges, removing all excess threads. Or we sew it with an overlocker. The main thing is to make the insert round so that it does not rub the baby’s legs or intimate area.
- Iron the product before use.
There is no need to make earbuds at home. They are sold in pharmacies and are inexpensive.
DIY sewing
To make a disposable diaper, you need to take one of the listed materials and a thread threaded into a needle. Next you need to follow the diagram below:
- Cut the fabric to the appropriate size for the child’s age and parameters;
- Overcast the fabric edges and fold them one to two centimeters on each side so that the fabric does not fray or unravel, and the product becomes reusable;
- Fold the fabric in half to form a square and turn it over with the fold down;
- With your left hand, move the edge from below to the center and turn the workpiece over to the other side, wrapping it in the same way;
- Sew up the curves of the workpiece for more comfortable wearing.
Note! A more detailed lesson can be learned from the video.
Material processing
How to make gauze diapers for your baby with your own hands? First you need to properly treat the base
It doesn't matter what you took as material. Of course, it should be a loose, soft and comfortable fabric
It is also worth taking a perfectly absorbent base.
Product “Scarf” master class
.
How to create gauze diapers for a baby in this way? Everything is very easy. Let's fold a huge square of gauze in half. Let's repeat the steps again. In the end we should have four layers of material. Fold the workpiece diagonally to form a triangle.
Fold the diaper with the blunt tip facing toward you. Let's place the child on it. We will place the blunt end of the product between the newborn’s legs and place it on the stomach. We tie the sides together in the navel area. They can also be easily tucked inside.
Diaper "Rectangle"
Gauze diapers for newborns can be secured with simple panties or an elastic band. How to create such an accessory? Take a cloth or gauze and fold it in half. Let's repeat the steps two more times. As a result, we will have a rather long rectangle.
Place the diapers in front of you vertically. We will place the child on it. One edge should be under the back, the second will go between the legs. A pre-sewn elastic band or rope will help secure such a product. You can also put fabric panties or rompers on your newborn.
"Hungarian" version of diapers
Place a piece of gauze in the shape of a square in front of you. We take the lower part with our hands and fold it so that the corners in our fingers align with the upper tips. After this, we attach the right part to the left part, folding the fabric in half. Slowly lift and straighten the lower right corner. We should have the appearance of a scarf or triangle. Carefully turn the diaper over to the other side with the bottom facing you. Take the remaining rectangular piece and fold it several times.
Let's place the baby on the created product. Place the folded rectangle between the baby’s legs. Place the left corner of the diaper on top and tightly wrap it under the back. We do the same with the right side of the product. Secure the corner by wrapping it in the belt.
Good earbuds
.
Gauze diapers for our children can consist of simple inserts. In this case, we need to prepare waterproof panties or regular underwear. Take square pieces of gauze and fold them in half. Then we place a small piece of fabric in the center. Alternatively, we can take an old terry towel. After that, use a sewing machine to stitch the gauze ends. At the end you will have a so-called insert - a gasket. It is worth noting that such a product will be several times more reliable than those products that we discussed above. However, it will take a little longer to dry after washing than opened gauze.
Place the blank in the child’s underpants or panties. After that, you can put them on the baby.
Required tools and materials
To make a homemade diaper, we will need:
- t-shirt;
- flannel diapers;
- elastic for clothes;
- scissors;
- pencil or marker;
- threads;
- pin.
Making a pattern for a reusable diaper. Fold the T-shirt in half. Attach the pattern and trace it with a marker. At the top we grab the sleeves - they will play the role of a kind of belt.
Cut along the line:
As a result, we should get a blank of the same shape as shown in the photo:
Now let's start making the liner. For this we need a diaper or towel. Basically, any fabric that absorbs moisture can be used.
For the pattern, we use a cardboard stencil measuring approximately 10x20 cm. Fold the diaper in half and mark the fabric so that one of its edges falls on the fold.
Cut out the blank for the liner. It should measure approximately 10x40 cm. In total, we need 3 such pieces of fabric.
We put them on top of each other and sew them along the edges. We will have a three-layer liner that can absorb enough liquid to make the child feel comfortable after several urinations.
We attach the liner to the base so that it is located approximately in the center. We sew it on one side - we should get a free end of the same size.
Now let's figure out how to sew a reusable diaper with your own hands. Cover the base with the sewn liner with the same piece of fabric. If there is some kind of design on it, make sure that it is inside. We sew both parts together, but leave a small hole through which we will need to turn the diaper inside out. For convenience, you can secure the liner with a pin.
Turn the diaper inside out. If you did everything correctly, you will get the same result as in the photo.
Please note that the ties should be long enough so as not to squeeze the baby's tummy.
We sew elastic bands on the sides and back so that the diaper fits more tightly to the body. We make holes on the front of the belt through which we will thread the ties so that they do not dangle. When making reusable diapers with your own hands, do not forget that your child should be comfortable in them.
That's basically it. We hope our master class will help you make a reusable diaper with your own hands and save a considerable amount of money. If you are interested in purchased reusable diapers, then read our reviews of Mum's Era, Waterproof and Splash About Happy diapers.
Leave comments and subscribe to our VK group to quickly receive the latest master classes!
https://tkanix.guru/krojka-i-shite/podguzniki-iz-marli-dlya-novorozhdennykh-poshagovo https://imalishka.ru/newborn/mnogorazovye-podguzniki-svoimi-rukami/https://allnappy.ru/ master-klassi/mnogorazovyj-podguznik-iz-futbolki-svoimi-rukami.html
"Hungarian" way
This method is very similar to the “kerchief” technique, but its difference is better absorption of liquid. For making it you will need a square gauze. To begin work, you need to fold the material in half. The fold should be on top, and the two flared parts should be on the bottom. Fold the resulting rectangle again. Its right side should lead to the left. All open ends of the gauze layers in the square should also be on the left.
The top layer must be taken by the lower left edge and pulled to the side until it stops. Flatten the fabric. The allocated part of the matter should look like a pyramid. Turn the resulting product over. The bottom edge should be left on top when flipping. This leaves us with a free square on the left. When it rises, there should be matter below in the shape of an inverted pyramid. Roll this square piece into a roll, flattening it a little.
Place the finished diaper on a flat surface so that two opposite corners are on top and the bottom edge is on the bottom. We put the baby on the diaper. The lower end must be threaded between the legs and laid on the tummy. Apply edges opposite to each other one by one. Fold the top layer into the bottom one.